Table Of Contents
This blog post is a companion to my From manual to automatic: Using OpenAPI to generate production-ready API clients talk! If you are unable to visit a session of this talk, you can read this blog post instead! This way as many people as possible can learn OpenAPI and API Client generation!
My talk offers some more in-depth information, so if you want to know more, take a look at my Speaking page to see when and where I will be giving this talk again! You can also contact me if you want me to give this talk at your event!
Introduction
Let’s assume you clicked on this link because you are curious about automating the process of building API clients, or because you want to learn (more) about OpenAPI. I’m glad you are here! Ever since I discovered OpenAPI, I have been a huge fan of it and it has changed the way I approach API development, and I want to share my enthusiasm and workflow with you!
When you build an API, you’ll always run into some problems which we’ll discuss in-depth. To me, one of the biggest problems is that you often need to build (at least) 1 API client, which is boring and error-prone work. You’ll need to copy and paste all the requests/responses, take care of authentication, (de)serialization, etc..! It doesn’t matter in what language you build your API or API client, the problems are always the same.
It would be a lot easier if we could just generate these API clients, right? Luckily this is possible when you use OpenAPI!
So, in this blog post I will cover everything you need to know about OpenAPI and API client generation. I will talk more about these problems you encounter when building API’s, explain what OpenAPI is and what it can do (Hint: You can generate API clients with it!). I’ll follow that up with some tools that can help you with API client generation so you never have to build an API client by hand again! Finally, we’ll talk about how you can automate the process of generating API clients so you can focus on building fun stuff instead of boring manual work!
You might be wondering why this post focuses a lot on the problems you encounter when building API’s and OpenAPI itself instead of diving straight into API client generation.
The reason why is because I believe it’s important that you understand the specification/tooling that you use in your projects. If you only learned about the API client generation without fully understanding OpenAPI, you might end up building suboptimal API clients or run into tough issues when something goes wrong. Also, there’s so much more to OpenAPI than just generating API clients, and I want to show you that!
Are you already familiar with OpenAPI or do you simply want to skip to the part where I show you how to generate API clients? Click here.
Building API’s is problematic
Developers have been building API’s and API clients for a while now. We build REST/JSON API’s and perform some HTTP calls to retrieve and manipulate some data on a server somewhere. Perhaps you’re even using HATEOAS 😉?
Before we talk about the these problems, let’s quickly define what an API client is:
An API client is a set of classes or organized code that encapsulates logic and models for API communication.
Without an API client we’d have to spread HTTP logic all over our codebase and deal with (de)serialization, authentication, error handling, etc all over the place. This will get messy quickly and make things difficult to test. Seperating all these concerns into an API client in your application makes this all a lot easier. You can simply use a UserClient with a GetUsers() function which will return a list of users from the API.
So, what are the problems we encounter when building API’s?
Managing the clients
I already mentioned this problem in the introduction. To use an API, you need to have an API client. Perhaps you’re building several apps for this API, so you’ll need to build the same API client in different languages. Or maybe you’re building a public API and the community builds different ways of interacting with your product. Let’s visualize this issue:
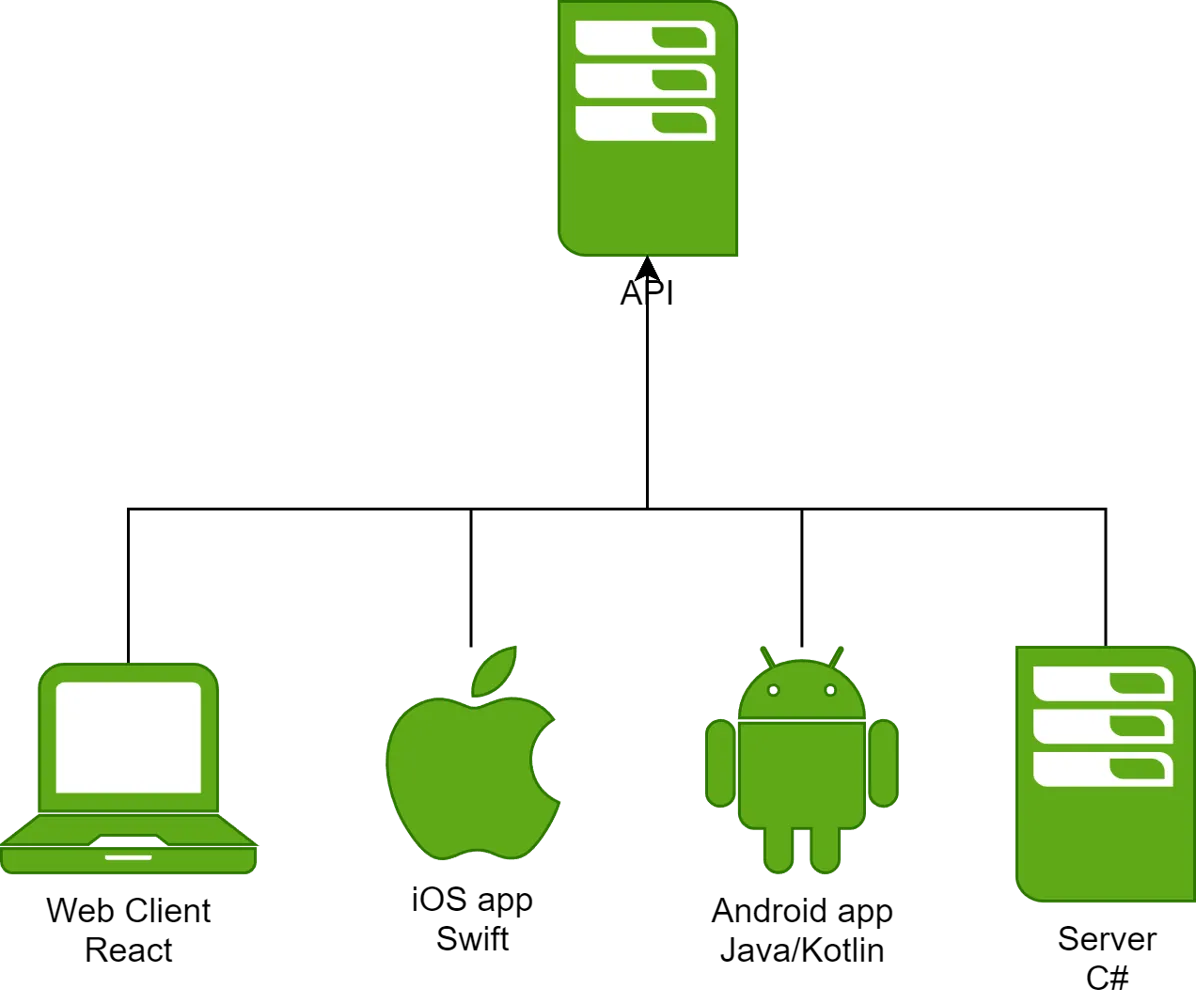
All these API clients do the same thing. They talk to your API. Their implementations will functionally be the same, only the programming language they’re built with are different. Having to copy all the request and response models, required headers, authentication implementations, etc.. is time-consuming and error-prone, as we’ll see in the next section.
Keeping changes in sync
Once you’ve built an API client, you’ll need to keep it up-to-date. When you add a new endpoint, change a request or response model, you’ll need to update all the API clients. Again, this is boring work and it’s easy to make mistakes. Even if you only need to manage 1 client (which is the case for most people), it’s still undesirable to have to do this manually. Let’s take a look at some of the problems you might encounter.
Imagine you’re building an Order API in C# and a client in Typescript:
API:
public class Order
{
    public int Id { get; set; }
    public int UserId { get; set; }
    public DateTimeOffset OrderDate { get; set; }
}
API Client:
interface Order
{
    id: number;
    userId: number;
    orderDate: Date;
}
Time and time again, I encounter the issue where the client isn’t updated correctly. For example, our Order gets a new DeliveryDate property. The API gets updated with this new property, but the client implements this incorrectly:
API:
public class Order
{
    public int Id { get; set; }
    public int UserId { get; set; }
    public DateTimeOffset OrderDate { get; set; }
    public DateTimeOffset? DeliveryDate { get; set; }
}
API Client:
interface Order
{
    id: number;
    userId: number;
    orderDate: Date;
    deliveryDate: Date; //Mismatch!
}
In C#, we’ve typed the DeliveryDate as DateTimeOffset?, which means that it can have a value or be null. In TypeScript, it’s typed as Date, which means it will always have a value. This is a simple example, but it’s easy to see how this can cause problems in your application because the front-end won’t expect a nullable DeliveryDate. These mistakes can be easy to make!
Finally, you’ll often find that clients call things differently compared to their API counterparts. This often happens during development where entity names aren’t solidified yet. This can cause a lot of confusion when you’re trying to find the related code in your API or API client, or when teams have difficulty communicating about the same thing because of different names.
Exposing API capabilities
The final problem I want to talk about is exposing API capabilities. API’s can be complex beasts. They can have a lot of endpoints, each with their own request and response models, security implementations, content types, different status codes, etc.. If the API were to change, you’ll need to look for all the updates yourself.
Ideally, both the producer and consumer of the API should make it simple to understand the API. But how do you do this? Having documentation would be great, but who keeps it up to date, and how?
Back in the day we had SOAP, which had a WSDL contract. This contract was a file that described the API, and you could generate a client from it. This solved this problem, but when we moved to HTTP API’s, we lost this free capability.
Introducing OpenAPI
Luckily, all of these problems can be solved by using OpenAPI. In this chapter we’ll cover what OpenAPI is, its history, and the OpenAPI specification and the amazing tooling that’s been developed for OpenAPI!
What is OpenAPI?
OpenAPI is a specification for designing, building and documenting API’s, made and maintained by the OpenAPI initiative. It creates common ground for developers to talk about API’s. If you need to understand how an API works you might have to dive into the codebase. However, this becomes quite difficult if you do not know the relevant programming language or framework. An OpenAPI specification can help you understand the API without having to dive into the codebase. It’s a contract that describes the API, and it’s a great way to communicate about the API.
Because OpenAPI is a specification, it’s not tied to a specific programming language or framework. This means that you can use OpenAPI with any programming language you like. Another benefit is that there’s a lot of tooling available for OpenAPI specifications. I’d argue that the most well known OpenAPI tool is SwaggerUI:

SwaggerUI rendering an OpenAPI definition of a conference API.
We’ll cover this tool in more detail later on. For now, I can still mention that you can compare an OpenAPI specification to a SOAP WSDL contract. It defines all the endpoints of an API and their request and response models and so much more. It can even describes the way your API is secured!
A brief history
OpenAPI has quite a history, as you can see in this image:

When I ask other developers if they’ve heard of OpenAPI, they often shake their heads. However, when I ask if they’ve heard of Swagger, they immediately reply yes! This is because OpenAPI was originally called Swagger and because a lot of developers think SwaggerUI is the only thing you can use OpenAPI for.
In 2015, the Swagger specification was donated to the OpenAPI initiative and renamed to OpenAPI. This is why you’ll often see the terms “Swagger” and “OpenAPI” used interchangeably.
I marked OpenAPI 3.0.0 as the most important release. At the time of writing, it’s the version that’s most widely used and has the most tooling available. It’s also the version that I’ll be talking about in this blog post.
As you can see, a 4th version is in the works with the title “Moonwalk”, which you can find here. It’s currently planned to release at the end of 2024 which is very exciting!
The OpenAPI specification
That’s enough theory and history. Let’s talk about the specification and how it works.
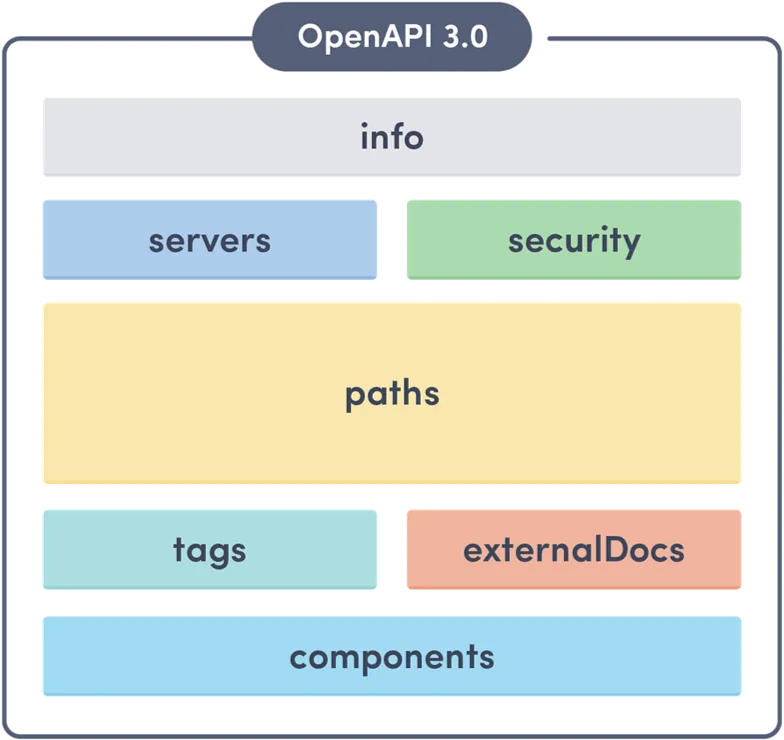
An OpenAPI specification can be written in either JSON or YAML. In this blog post, I’ll be using YAML. The specification is divided into several parts, namely:
- Metadata: This part contains general information about the API, such as the title, version, description, server information and links to external docs
- Paths: This part contains all the endpoints of the API. Each endpoint contains information about the request and response models, security, etc..
- Components: This part contains reusable components such as request and response models, security schemes, etc..
- Security: This part contains information about the security of the API.
- Tags: This part contains information about the tags of the API.
The best way to learn is to make something. So, let’s make a simple specification for a conference API in this section. We’ll be building a subset of the Conference API screenshot you saw earlier in the SwaggerUI image. The full specification can be found in the links to the demo at the end of this blog post.
Metadata
Our conference API will have the following metadata:
openapi: 3.0.0
info:
  title: Conference API
  description: API for managing conference talks
  contact:
    name: Sander ten Brinke
    url: https://stenbrinke.nl
    email: s.tenbrinke2@gmail.com
  # Note: This is the version of your OpenAPI specification, NOT related to API versioning!
  version: 1.0.0
externalDocs:
  url: 'https://example.com/docs'
  description: Find more info here
servers:
  - url: https://api.example.com
    description: Production server
This information is quite useful. The title and description speak for themselves. I think having contact information is also quite useful if you want to reach out to the person/team that built the API. The externalDocs field is also quite useful. It’s a link to the documentation of the API in case the creator has published more explicit documentation. This way, you can easily find more information about the API. Finally, the servers field contains information about the server(s) the API is hosted on. Useful if you quickly want to find out how you can talk to specific environments of the API!
Paths
The paths object documents all the API URLs with their HTTP methods, headers, request/response bodies, documentation and more. In this section we’ll split it into several sections and talk about the important parts.
Endpoints
paths:
  /talks:
    get:
      tags:
        - "Talks"
      summary: Get a list of talks
      operationId: Talks_GetTalks
      responses: # Will be handled in the next sections
    post:
      tags:
        - "Talks"
      summary: Create a new talk
      operationId: Talks_CreateTalk
      requestBody: # Will be handled in the next sections
    # Other HTTP methods for /talks can be set up here
  # Other endpoints can be set up here
In this example, we have a /talks endpoint with a GET and POST method. The GET method will return a list of talks, and the POST method will create a new talk.
The tags field is used to group endpoints together. This way, you can easily find all the endpoints that belong to a specific group, like all the endpoints for the Talk entity.
The operationId field is a unique identifier for the operation (“endpoint”), which is essential for tooling, as we’ll see later on.
Parameters
The previous example only showed a ’list’ and ‘create’ endpoint. Of course, we might also have endpoints with parameters, in case we want to retrieve an individual talk:
paths:
  # Endpoints from the previous example would be here
  /talks/{id}:
    get:
      tags:
        - "Talks"
      summary: Get a specific talk
      operationId: Talks_GetTalk
      parameters:
        - name: id
          in: path
          required: true
          schema:
            type: integer
You’ll notice that this endpoint defines {id} in its path which is referenced by the parameters object. It’s a required parameter of type integer. We’ll talk about the schema in a bit!
Finally: a path parameter isn’t the only type of parameter you can use. You can also have query, header, cookie and requestBody parameters.
Request and response bodies
Let’s continue with the next important section, which are the request and response bodies!
We’ll continue writing the POST /talks endpoint from the previous example:
paths:
  /talks:
    post:
      tags:
        - "Talks"
      summary: Create a new talk
      operationId: Talks_CreateTalk
      requestBody:
        required: true
        content:
          application/json:
            schema: # Will be handled next!
              $ref: "#/components/schemas/Talk"
      responses:
        "201":
          description: Created
          content:
            application/json:
              schema: # Will be handled next!
                $ref: "#/components/schemas/Talk"
        "400":
          description: Bad Request
          content:
            application/json:
              schema: # Will be handled next!
                $ref: "#/components/schemas/ProblemDetails"
This example is a bit bigger than the previous ones, so let’s break it down:
- The
requestBodyfield is used to define the request body of the endpoint. In this case, it’s required and must be of typeapplication/json. Theschemafield is used to reference theTalkschema from thecomponentsobject. The next section will talk more about it; but for now, you can see it as a model of the request body. - You can also define multiple request bodies in case your API should be able to handle JSON and XML for example. The client can then set their prefence in the
Acceptheader. - The
responsesfield is used to define the responses of the endpoint. In this case, we have a201(Created) and400(Bad Request) response. The201response is a successful response, and the400response is a bad request. Both responses have aschemafield that references corresponding response model. - You’ll notice the response model referencing the
ProblemDetailsschema. This is a standard way in API development for describing describing error responses. You can learn more about it here. - You can also define multiple response bodies in the same way as request bodies so XML requests can also return XML responses.
Components
The components object defines a set of reusable objects for your API. This doesn’t just include request and response models, but also security schemes, parameters, etc!
You’re not required to use this; you can also define your models inline in the paths, requestBody, responses objects. However, using the components object is a lot cleaner and more maintainable because they allow you to seperate your endpoints from your models, which will be the chunkiest section of your OpenAPI document. That’s why I recommend that you put all your request and response models in the components object, even if you do not reuse them!
components: # (Showing only a subset of component types)
  parameters: # ...
  requestBodies: # ... (There's a lot more!)
  schemas:
    Talk:
      type: object
      properties:
        id:
          type: integer
        title:
          type: string
        speaker:
          $ref: "#/components/schemas/Speaker"
        time:
          type: string
          format: date-time
    Speaker:
      type: object
      properties:
        firstname:
          type: string
        lastname:
          type: string
In this example you’ll find the Talk schema we saw before. This now defines the Talk object with an id, title, speaker and time property. The speaker property references the Speaker schema. This way, you can easily reuse the Speaker schema in other parts of your API.
Security
There are a lot of different things you can do with the schema object. I want to talk about one extra thing: security. You can define security schemes in the components object and reference them in the security object in the paths object.
This is important because API’s are often secured with authentication and authorization so it makes sense to be able to describe this in OpenAPI as well.
components:
  securitySchemes:
    BasicAuth: # …
    BearerAuth: # …
    ApiKeyAuth: # …
    OpenID: # …
    OAuth2:
      type: oauth2
      flows:
        authorizationCode:
          authorizationUrl: https://example.com/oauth/authorize
          tokenUrl: https://example.com/oauth/token
          scopes:
            read: Grants read access
            write: Grants write access
            admin: Grants access to admin operations
There are quite a lot of different built-in schemes, like BasicAuth, BearerAuth, ApiKeyAuth, OpenID and OAuth2. In this example, we define an OAuth2 scheme with an authorizationCode flow. This flow is quite common in OAuth2 implementations. You can also define scopes, which are used to define the permissions of the user.
This security scheme is only a definition. We still need to apply it on your endpoints. You can do this per path, or globally. Here’s an example of applying the OAuth2 scheme globally:
security:
  - OAuth2:
      - read
      - write
  - ApiKeyAuth: []
This example applies the OAuth2 schema with the read and write scopes to all the endpoints. It also applies the apiKeyAuth scheme to all the endpoints, but without any scopes, which signals that 2 authentication methods can be used.
Tags
Finally, I want to mention Tags. This is a way to group your endpoints together. This is useful for documentation purposes, but also for generating API clients. You can group all the endpoints that belong to a specific entity together, like all the endpoints for the Talk entity.
You can define these on a per-endpoint basis, like you’ve seen in earlier examples, or globally in the document like so:
tags:
  - name: Talks
    description: Endpoints for managing talks
  - name: Speakers
    description: Endpoints for managing speakers
Design-first vs code-first
You now know how to read an OpenAPI document, so you also know how to write one. But there are actually 2 approaches for ending up with an OpenAPI document: design-first and code-first. Let’s talk about both approaches and discuss the ups and downs.
Design-first
A design-first approach for an OpenAPI document means that you first write the OpenAPI document by hand and then implement it in your API code. This approach is great because your OpenAPI document is the source of truth.
You could even attempt to generate your API from the OpenAPI document using OpenAPI Tooling! However, I do not recommend this because the result often isn’t high quality and you’ll need to do a lot of manual work to get it right.
Because of this, I do not recommend a design-first approach:
- We need to write both the OpenAPI document and the server implementation which means we’re writing the same thing twice.
- Because we’re writing the same thing twice, we need to be careful that we implement the OpenAPI document correctly in our server code. Any mistakes in the implementation reduces the value of the OpenAPI document as the source of truth.
Code-first
The 2nd option is a code-first approach. This means that you first write your server code and then generate the OpenAPI document from it.
This approach is great because you only need to write the server code and the OpenAPI document is generated for you, which means we don’t need to do the same work twice! However, your server code might need some extra annotations to generate the OpenAPI document correctly.
I mainly work with .NET which has a rich ecosystem for generating OpenAPI documents from your server code, like Swashbuckle.AspNetCore, NSwag and Microsofts own OpenAPI library.
Other ecosystems might prefer a design-first approach if OpenAPI document generators aren’t available or if the generated OpenAPI document isn’t of high quality.
An example of generating an OpenAPI document from your server code in .NET:
/// <summary>
/// Get a list of talks
/// </summary>
[HttpGet]
public async Task<ActionResult<IEnumerable<Talk>> GetTalks()
{
    var talks = await _talksRepository.GetTalks();
    return Ok(talks);
}
Using Swashbuckle.AspNetCore/NSwag, it can generate a document like this:
openapi: 3.0.0
info:
  title: Conference API
  description: API for managing conference talks
paths:
  /talks:
    get:
      tags:
        - "Talks"
      summary: Get a list of talks
      operationId: Talks_GetTalks
      responses:
        "200":
          description: A list of talks
          content:
            application/json:
              schema:
                type: array
                items:
                  $ref: "#/components/schemas/Talk"
OpenAPI tooling ❤️
Now that you know what OpenAPI is and how to write an OpenAPI document, let’s talk about what you can do with it.
Because OpenAPI is a specification, there’s a lot of tooling available for it. In this section, I’ll talk about some of the most popular tools and how they can help you with your API development.
A lot of these tools, and so many more, for almost any programming language under the sun, can be found on the wonderful openapi.tools website, so I recommend that you check it out!
Documentation
An API can be quite complex and hard to understand. What endpoints are available? What are the request/response bodies? What does an endpoint do, and when should it be used? To answer these questions, you’ll need to have a good documentation. OpenAPI tooling can help you with this. You can use tools like SwaggerUI, Redocly, Scalar (the new kid on the block) and more to render your OpenAPI document into a nice-looking documentation website where you can even try out the calls to your API, including authentication!
In this image carousel you can see how SwaggerUI, Redocly and Scalar render the Conference OpenAPI document.


If you use .NET, you can use Swashbuckle.AspNetCore, NSwag or Scalar to get the same results with a few lines of code.
Client generators
One of the most powerful features of OpenAPI is the ability to generate API clients. This means that you can generate API clients in any language you like, which saves you a lot of time and effort. We’ll talk more about this in the next section.
Server generators
I already mentioned the existance of server generators (and that I don’t really recommend them). However, I find the concept fascinating. In a perfect world, you could write an OpenAPI specification and generate a server in any language of choice. If you’d need to change tech stack you would only need to regenerate it to a different language. Tools like OpenAPI-generator can do this.
Sadly, we don’t live in a perfect world and an API is more than just the endpoints. Business logic can’t be generated, and you’ll still need to write this yourself, so the benefit of generating a server isn’t that big.
Mock Servers
Mock servers are awesome. They’re such a unique feature that you might never have considered before.
Let’s say you need to build a new feature for an application that requires a new endpoint and a new web page that needs to talk to this endpoint. You can’t build the web page yet because the endpoint isn’t ready. You could wait for the endpoint to be ready, but that might take a while. Perhaps you create some fake data in your front-end to simulate the endpoint and connect the web page to the real endpoint when it’s ready.
However, perhaps the API endpoint doesn’t contain all the data you need or the data is in a different shape than you expected. Even the naming can be different, which can cause confusion. All of this means that you need to make even more changes to your front-end before you’re done.
That’s where a mock server comes in. This is a fake server that runs in your terminal based on an OpenAPI document. It will return the data you expect, in the shape you expect, with the names you expect. This way, you can build your front-end without needing the real endpoint. You can design the new endpoint in an OpenAPI document or generate it based on an empty endpoint. Next, you connect your front-end to the mock server URL.
When the real endpoint is ready, you can switch to the real server without needing to make any changes to your front-end, because both implement the same OpenAPI specification!
A popular mock server is Prism. I also want to give a shoutout to open-api-mocker that allows you to run a mock server that returns fake data based based on your OpenAPI document with faker.js. Geert van der Cruijsen wrote a great blog post about this tool, so check it out!
If you’re looking for more options, Scalar also provides a mock server out of the box!
Testing
Whilst you can test your API with tools like SwaggerUI, there’s dedicated OpenAPI testing tools out there, too.
Postman supports OpenAPI, so you can import your OpenAPI document and use it to test your API. This means you don’t need to write all your API definitions anymore!
Check out the openapi.tools website for more tools!
Validation
If you prefer to use a design-first approach or simply want to validate your OpenAPI spec, you’re in luck. There’s lots of tooling available for this as well.
Generating API clients
You now know what OpenAPI is, how to write an OpenAPI document and what you can do with OpenAPI tooling. In this section, we’ll cover OpenAPI tooling that can help you with generating API clients with OpenAPI. This is really exciting because you’ll never have to build an API client by hand again!
Language support
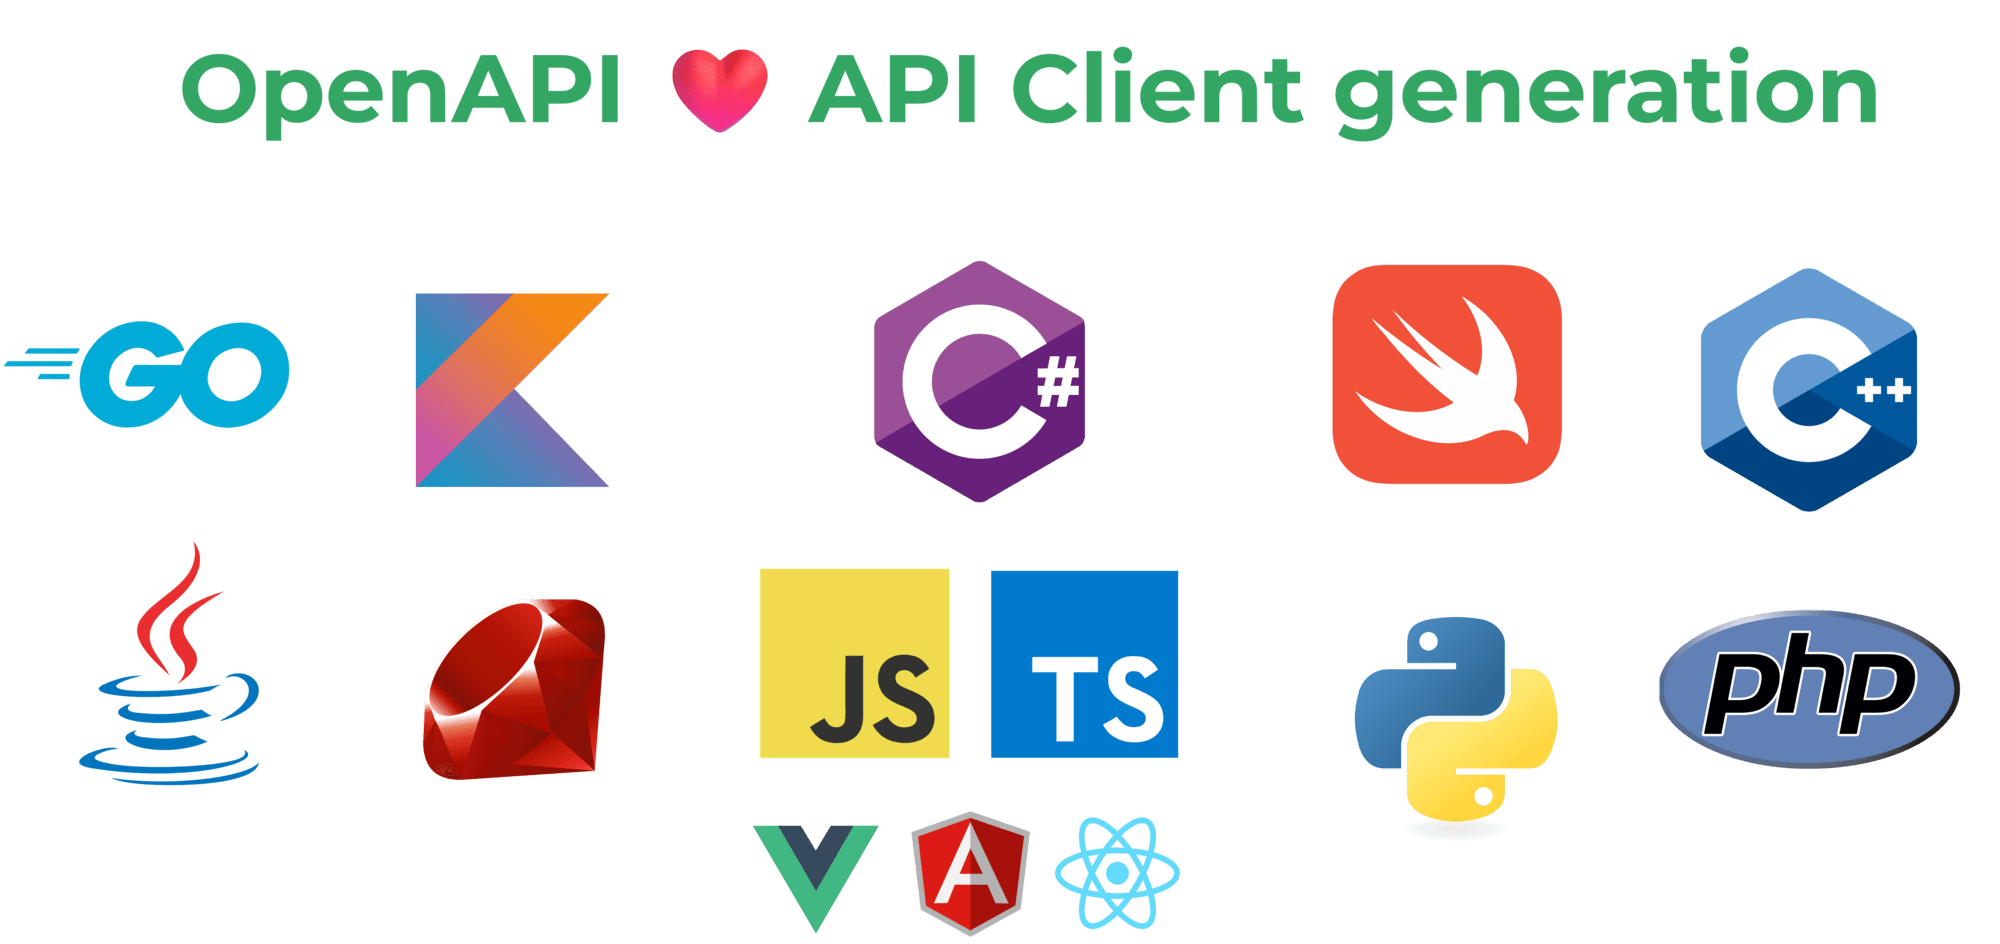
There are a lot of API client generation tools out there. Some specialize in specific programming languages or frameworks, others support a wide variety of languages like Go, Kotlin, C#, Swift, C++, Java, Ruby, JavaScript, TypeScript, Python, PHP and more.
(Almost) all programming languages are supported for API client generation!
API client generators
So, what tools can you use to generate API clients, and which ones do I recommend?
- My favorite API Client generator is
NSwag, which can generate C# and TypeScript clients. It can even specialize in generating TypeScripts clients for specific frameworks/libraries!
- Swashbuckle.AspNetCore also has a generator, but it only supports C#. I recommend using NSwag because it supports more languages and has more features.
- Kiota is Microsoft’s latest API client generator for a wide variety of languages. If you’ve ever used the Microsoft Graph SDK, you’ve used Kiota, because it’s API client is generated with Kiota!
- OpenAPI generator is a popular tool that can generate API clients in a wide variety of languages.
Again, there are a lot of tools out there, so I recommend you check out openapi.tools to find the tool that fits your needs! I’ll now proceed to talk about these 3 tools and how you can start using them.
Some people think generated API clients are “ugly” or don’t work very well. That’s not true in my experience. The core problem often is that their OpenAPI document isn’t correct or misses information.
Remember the age old saying: “Garbage in, garbage out”. So, if you write a good OpenAPI document, you’ll get a good API client in return, and the opposite is also true 😉.
Every framework has different ways to end up with a good OpenAPI document. For .NET, I recommend reading the documentation. Make sure to annotate your endpoints with all the status codes and request/response models!
NSwag
NSwag is an open-source tool made by Rico Suter and other members of the community. It has more than 50 million downloads and is, in my opinion, the best tool for generating API clients in the .NET ecosystem for C# and TypeScript. It’s even used by Visual Studio when generating API Clients directly from the IDE!
Keep in mind that NSwag doesn’t just generate API clients. It can also generate API documentation that plugs directly into your ASP.NET Core projects, which I also use in my projects!
There’s multiple ways to use NSwag. There’s a CLI-based approach, a wonderful Windows-only GUI called NSwagStudio and MSBuild integration.
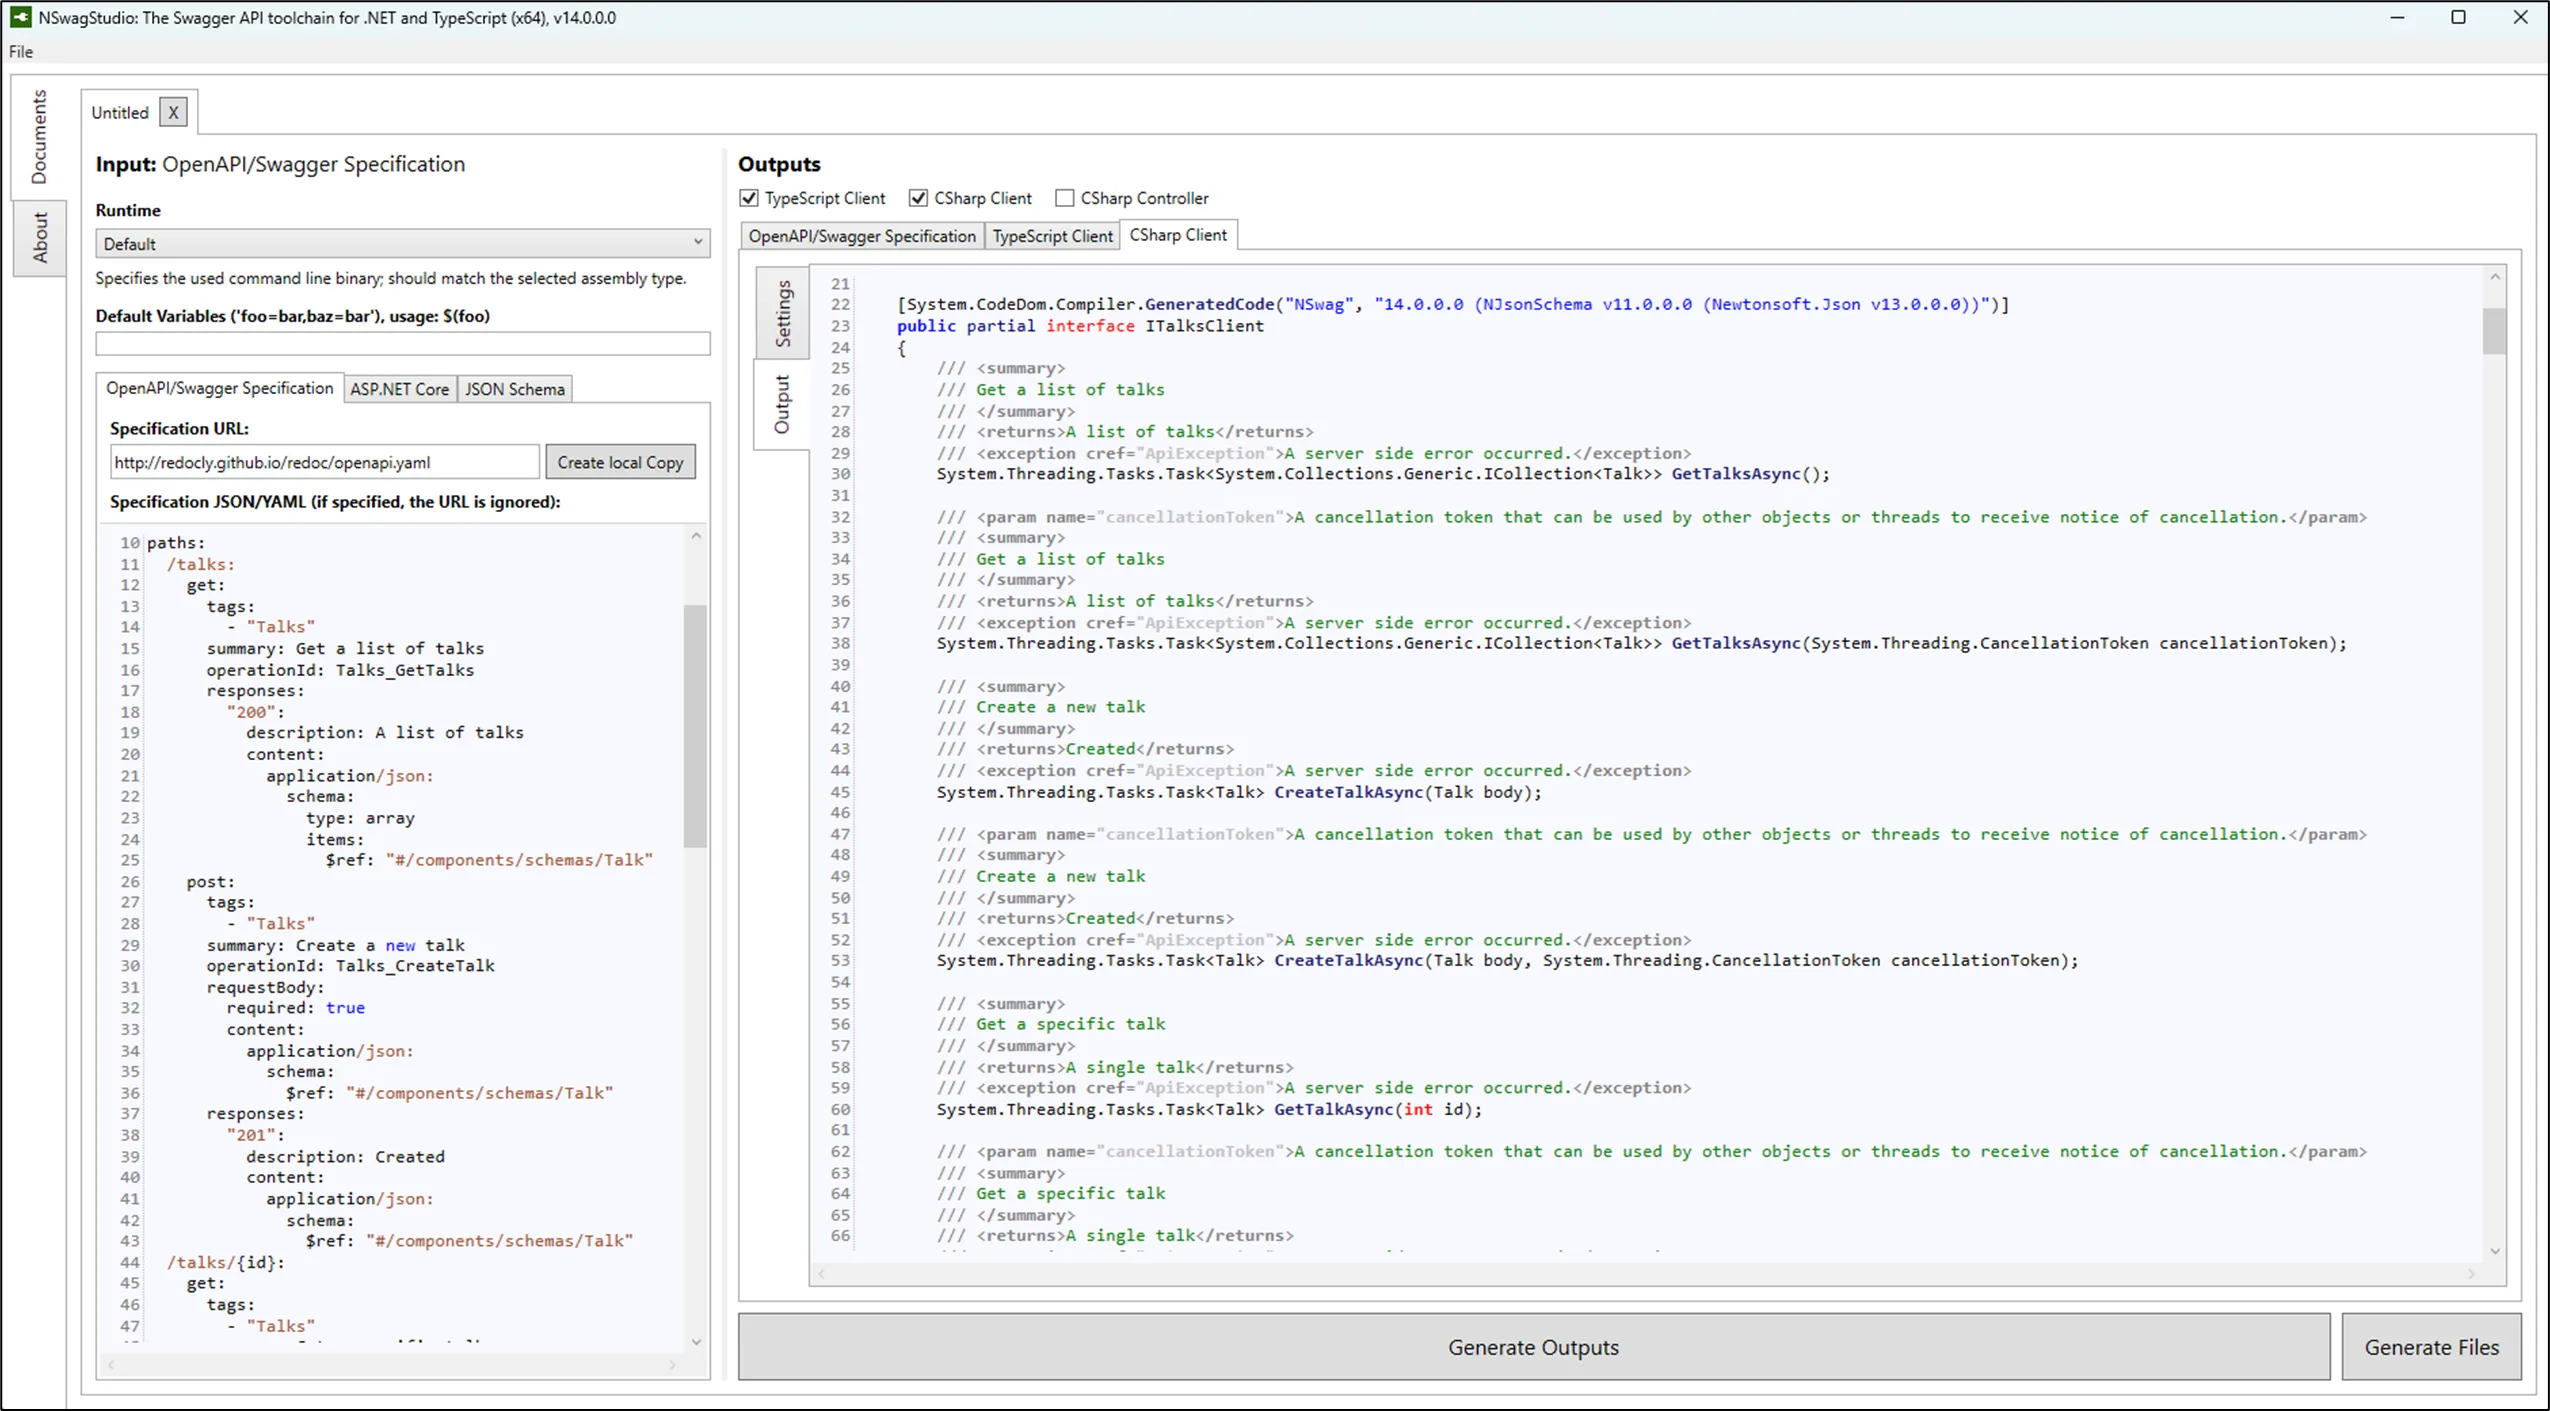
NSwagStudio makes it easy to configure and generate API clients.
You’ll have to create a .nswag file that contains the settings for the generator. Here’s an example of a .nswag file that generates a C# client based on a .json file that contains an OpenAPI document.
Click to view the .nswag file
{
  "runtime": "Net80",
  "defaultVariables": null,
  "documentGenerator": {
    "fromDocument": {
      "json": "",
      "url": "conference-openapi-definition.json",
      "output": null,
      "newLineBehavior": "Auto"
    }
  },
  "codeGenerators": {
    "openApiToCSharpClient": {
      "clientBaseClass": null,
      "configurationClass": null,
      "generateClientClasses": true,
      "generateClientInterfaces": true,
      "clientBaseInterface": null,
      "injectHttpClient": true,
      "disposeHttpClient": true,
      "protectedMethods": [],
      "generateExceptionClasses": true,
      "exceptionClass": "ConferenceApiException",
      "wrapDtoExceptions": true,
      "useHttpClientCreationMethod": false,
      "httpClientType": "System.Net.Http.HttpClient",
      "useHttpRequestMessageCreationMethod": false,
      "useBaseUrl": false,
      "generateBaseUrlProperty": false,
      "generateSyncMethods": false,
      "generatePrepareRequestAndProcessResponseAsAsyncMethods": false,
      "exposeJsonSerializerSettings": false,
      "clientClassAccessModifier": "public",
      "typeAccessModifier": "public",
      "generateContractsOutput": false,
      "contractsNamespace": null,
      "contractsOutputFilePath": null,
      "parameterDateTimeFormat": "s",
      "parameterDateFormat": "yyyy-MM-dd",
      "generateUpdateJsonSerializerSettingsMethod": true,
      "useRequestAndResponseSerializationSettings": false,
      "serializeTypeInformation": false,
      "queryNullValue": "",
      "className": "ConferenceApi{controller}Client",
      "operationGenerationMode": "MultipleClientsFromOperationId",
      "additionalNamespaceUsages": [],
      "additionalContractNamespaceUsages": [],
      "generateOptionalParameters": true,
      "generateJsonMethods": false,
      "enforceFlagEnums": false,
      "parameterArrayType": "System.Collections.Generic.IReadOnlyCollection",
      "parameterDictionaryType": "System.Collections.Generic.IReadOnlyDictionary",
      "responseArrayType": "System.Collections.Generic.IReadOnlyCollection",
      "responseDictionaryType": "System.Collections.Generic.IReadOnlyDictionary",
      "wrapResponses": false,
      "wrapResponseMethods": [],
      "generateResponseClasses": true,
      "responseClass": "SwaggerResponse",
      "namespace": "Conference.Api.Client",
      "requiredPropertiesMustBeDefined": true,
      "dateType": "System.DateOnly",
      "jsonConverters": null,
      "anyType": "object",
      "dateTimeType": "System.DateTimeOffset",
      "timeType": "System.TimeSpan",
      "timeSpanType": "System.TimeSpan",
      "arrayType": "System.Collections.Generic.ICollection",
      "arrayInstanceType": "System.Collections.ObjectModel.Collection",
      "dictionaryType": "System.Collections.Generic.IDictionary",
      "dictionaryInstanceType": "System.Collections.Generic.Dictionary",
      "arrayBaseType": "System.Collections.ObjectModel.Collection",
      "dictionaryBaseType": "System.Collections.Generic.Dictionary",
      "classStyle": "Poco",
      "jsonLibrary": "SystemTextJson",
      "generateDefaultValues": true,
      "generateDataAnnotations": true,
      "excludedTypeNames": [],
      "excludedParameterNames": [],
      "handleReferences": false,
      "generateImmutableArrayProperties": false,
      "generateImmutableDictionaryProperties": false,
      "jsonSerializerSettingsTransformationMethod": null,
      "inlineNamedArrays": false,
      "inlineNamedDictionaries": false,
      "inlineNamedTuples": true,
      "inlineNamedAny": false,
      "generateDtoTypes": true,
      "generateOptionalPropertiesAsNullable": false,
      "generateNullableReferenceTypes": true,
      "templateDirectory": null,
      "typeNameGeneratorType": null,
      "propertyNameGeneratorType": null,
      "enumNameGeneratorType": null,
      "serviceHost": null,
      "serviceSchemes": null,
      "output": "GeneratedConferenceApiClient.cs",
      "newLineBehavior": "Auto"
    }
  }
}
With this, you can use NSwagStudio, CLI or MSBuild integration to generate the client. For example, you can install the nswag CLI directly and run the following command:
nswag run conference.nswag
This will output an GeneratedConferenceApiClient.cs file that contains the generated client. Below you can find an excerpt of one of the interfaces it generates that you can use in your C# codebase. Note that it will also generate the class implementation, but I’ve omitted it for brevity.
public partial interface IConferenceApiTalksClient
{
    /// <param name="cancellationToken">A cancellation token that can be used by other objects or threads to receive notice of cancellation.</param>
    /// <summary>
    /// Get a list of talks
    /// </summary>
    /// <returns>A list of talks</returns>
    /// <exception cref="TowardsMesApiException">A server side error occurred.</exception>
    System.Threading.Tasks.Task<System.Collections.Generic.IReadOnlyCollection<Talk>> GetTalksAsync(System.Threading.CancellationToken cancellationToken = default(System.Threading.CancellationToken));

    /// <param name="cancellationToken">A cancellation token that can be used by other objects or threads to receive notice of cancellation.</param>
    /// <summary>
    /// Create a new talk
    /// </summary>
    /// <returns>Created</returns>
    /// <exception cref="TowardsMesApiException">A server side error occurred.</exception>
    System.Threading.Tasks.Task<Talk> CreateTalkAsync(Talk body, System.Threading.CancellationToken cancellationToken = default(System.Threading.CancellationToken));

    /// <param name="cancellationToken">A cancellation token that can be used by other objects or threads to receive notice of cancellation.</param>
    /// <summary>
    /// Get a specific talk
    /// </summary>
    /// <returns>A single talk</returns>
    /// <exception cref="TowardsMesApiException">A server side error occurred.</exception>
    System.Threading.Tasks.Task<Talk> GetTalkAsync(int id, System.Threading.CancellationToken cancellationToken = default(System.Threading.CancellationToken));
}
Personally, I’m really happy with this result! Let me know what you think in the comments below!
Kiota
Kiota is an open-source API client generator tool made by Microsoft. It’s most well known for powering the Microsoft Graph SDK, a platform where you can access everything related to Microsoft services using 1 API.
Kiota can be
installed in multiple ways. You can use it as a CLI tool with the kiota command, run it as a dotnet tool using dotnet kiota, in Docker, and more. Another thing worth mentioning is that there’s a
VSCode extension available to generate clients. Neat!
One feature that distinguishes Kiota from NSwag is that you use kiota search to search public and private registries for OpenAPI documents. For example, you can use kiota search github to find GitHub’s OpenAPI document. Next, you can use kiota download to download one of these definitions and use kiota generate to generate a client for it. That’s a pretty good developer experience!
One of Kiota’s core principles is that it’s very opinionated. There’s not a lot of settings to tweak because it needs to be able to work for a large amount of languages.
To generate a Kiota client for C#, you can use the following command:
# Kiota is installed as a dotnet tool in this case
dotnet kiota generate --clean-output \
					  --language "csharp" \
					  --openapi "conference-openapi-definition.json" \
					  --output "ApiClients/Kiota" \
					  --namespace-name "ConferenceApp.Clients.Kiota" \
					  --class-name "KiotaConferenceClient"
Because Kiota is opininiated, there’s only 1 way to generate clients. It does so based on the API path: A GET api/talks/{id} endpoint will turn into a client that can access this endpoint by running client.Api.Talks[id].GetAsync(). This looks pretty clean when your API is RESTful but can look a bit weird when your API isn’t. Especially the indexer syntax is a bit unusual. It isn’t the index of an array; it’s the ID of the entity you want to access.
There’s other features as well, like its built-in authentication support which makes it easy to authenticate with your API. You can read more about it in the Kiota documentation.
OpenAPI generator
Finally, I want to talk about OpenAPI generator. This one has the most language support of all the tools I’ve mentioned. It supports over 70 languages, which is quite impressive!
Installing it is quite simple. You can install openapi-generator using npm, brew, scoop, docker or download the jar to invoke it with java.
You can generate a C# client using docker like this:
docker run --rm -v ${PWD}:/local \
           openapitools/openapi-generator-cli:v7.6.0 generate \
            -i /local/conference_api.yml \
            -g csharp \
            -o /local/out/csharp
I was quite surprised to see the result! Not only do we get an API client, we also get exhaustive documentation on publishing it to a package feed, usage instructions, and more. It’s quite impressive! Take a look at this image with a part of the generated interface, readme, and folders structure:

An overview of the result of using openapi-generator.
There’s a lot of options to tweak, so to learn more about OpenAPI generator I’ll refer you to the documentation.
Let’s automate the process!
In this final “chapter” I want to talk about automating the process of generating the API clients. This makes it a lot easier to keep an application up to date with an API’s changes.
There’s many ways to do this. I prefer to create a script that will generate the client. This approach is great because anyone can run the script and generate the client without needing to know how to use the generator tools. It also prevents different people from generating a client with different settings which can cause confusion.
You can then use this script and the associated output in a CI/CD pipeline to automate it even further.
Writing a script for generating API clients
Below you’ll find a script that generates an API client with NSwag. You can also change this script to use Kiota or OpenAPI generator. You can use my nswag configuration file as a sensible starting point.
Note: This version of the script requires you to insert the latest OpenAPI definition in the associated file that’s referenced in the .nswag file. You can also change nswag’s url field to reference a remote URL that contains the OpenAPI definition.
Powershell:
$ErrorActionPreference = "Stop"

try {
    # Makes the script work when called from any directory
    $scriptPath = Join-Path -Path $PSScriptRoot -ChildPath "../PATH/TO/NSWAG-CONFIG/conference.nswag"

    Write-Host "Generating Conference API Client with NSwag..`n"

    & dotnet nswag run $scriptPath

    if ($LASTEXITCODE -ne 0) {
        throw "NSwag code generation failed with exit code $LASTEXITCODE"
    }

    Write-Host "Conference API client has been generated successfully."
    Write-Host "The nuget package has NOT been created yet. This can be done with {YOUR_CI/CD_PIPELINE}."
}
catch {
    Write-Host "An error occurred: $($_.Exception.Message)"
    exit 1
}
Bash:
#!/bin/bash
set -euo pipefail
IFS=$'\n\t'

# Change directory to the folder where the nswag file is located
cd "$(dirname "${BASH_SOURCE[0]}")"
scriptPath="../PATH/TO/NSWAG-CONFIG/conference.nswag"

echo -e "Generating Conference API Client with NSwag....\n"

dotnet nswag run "$scriptPath"

if [ $? -ne 0 ]; then
    echo "NSwag code generation failed with exit code $?"
    exit 1
fi

echo "Conference API client has been generated successfully."
echo "The nuget package has NOT been created yet. This can be done with {YOUR_CI/CD_PIPELINE}."
To ensure that dotnet nswag is always available, install it
as a local tool with the following commands:
# Ensure you're in the root of your project
# You only need to perform these 2 steps once.
dotnet new tool-manifest
dotnet tool install nswag.console

# Run this (once) to install the tool and make it available in your project
# Don't forget to update your README.MD so others know they need to run this as well if they want to generate an API client.
dotnet tool restore

# Testing if nswag CLI works
dotnet nswag help
The generated API client is now available in your project. You can now use it in your application!
Publishing API clients to a package feed
To automate this process even further, you can choose to publish the generated API client to a package feed. This prevents multiple teams from having to generate the client themselves. They can simply install the package from the feed, or choose to generate their own version if they want
We could also write a script to do this, but it’s even better to use a CI/CD pipeline for this like Azure Pipelines or Github Actions. We can now run this pipeline (or trigger it based on changes made to an API) and automatically publish the API client on a package feed, available for others to download.
It’s important to realize that we now run the script from the perspective of the API producer and not as the consumer. The consumer can now install the package from the feed and use it in their application.
Because the API client is generated in a script, we only need to call this script in the pipeline and envelop the result in a .NET library. I’ll refer you to the documentation to learn how to create a .NET Library to publish to a package feed.
Here’s an example of how you can do this with a .NET library Azure Pipelines and push the result to a NuGet feed in Azure Artifacts. This will be a private feed so only your organisation can access it. If you’re building a public API, you’ll want to make the feed public.
# This pipeline will run the `scripts/generate-conference-api-client.sh` script to generate an API client.
# It will store the result in the `Conference.Api.Client` .NET project and pack that project into a NuGet package.
# This package will then be pushed to a NuGet feed in Azure Artifacts.
name: $(major).$(minor)$(rev:.r)

# You'll need to run this pipeline yourself when you want to generate the API client
# Automating this based on changes in the API is a bit more complex and left as an exercise for the reader.
# I prefer calling this pipeline manually so I don't generate new versions unnecessarily.
trigger: none

pool:
  vmImage: 'ubuntu-latest'

variables:
  buildConfiguration: "Release"
  major: 1
  minor: 0

steps:
  - task: UseDotNet@2
    displayName: "Install .NET SDK"
    inputs:
      packageType: sdk
      # This will use the .NET SDK version specified in the global.json file.
      # I recommend using a global.json file to pin the version of the SDK so your team and pipeline use the same version.
      # https://learn.microsoft.com/en-us/dotnet/core/tools/global-json
      # You can set this to false and specify a version to use a specific version of the SDK.
      useGlobalJson: true

  - task: NuGetAuthenticate@1
    displayName: 'Azure Artifact feed authentication'

  # This installs `dotnet nswag` based on the tool-manifest.
  - script: |
      dotnet tool restore
    displayName: "Restore .NET tools"
    retryCountOnTaskFailure: 7 # This task is flaky outside of our control, so we retry it a few times when it fails

  # This runs the script and generates the API client
  - script: |
      bash scripts/generate-conference-api-client.sh
    displayName: "Generate API client with nswag based on OpenAPI spec"

  # Now we need to ensure the .NET Library that contains the updated API client
  # is ready to be published.
  - task: DotNetCoreCLI@2
    displayName: Restore nuget packages
    inputs:
      command: "restore"
      feedsToUse: "config"
      # If you do not use multiple package feeds, you can remove this line
      nugetConfigPath: "nuget.config"
      # This assumes that you have a .NET library called "Conference.Api.Client"
      workingDirectory: "src/Conference.Api.Client"
    retryCountOnTaskFailure: 7 # This task is flaky outside of our control, so we retry it a few times when it fails

  - task: DotNetCoreCLI@2
    displayName: Build API client
    inputs:
      command: 'build'
      arguments: '--configuration $(BuildConfiguration) --no-restore'
      workingDirectory: 'src/Conference.Api.Client'

  - task: DotNetCoreCLI@2
    displayName: Pack API client
    inputs:
      command: 'pack'
      arguments: '--configuration $(BuildConfiguration) --no-build'
      packagesToPack: 'src/Conference.Api.Client/*.csproj'
      versioningScheme: 'byBuildNumber'

  - task: NuGetCommand@2
    displayName: Push Api.Client package to Azure Artifacts
    inputs:
      command: 'push'
      packagesToPush: '$(Build.ArtifactStagingDirectory)/**/*.nupkg;!$(Build.ArtifactStagingDirectory)/**/*.symbols.nupkg'
      nuGetFeedType: 'internal'
      publishVstsFeed: 'YOUR_FEED_ID_HERE' # IMPORTANT: Replace this with your feed ID
And that’s all you need! You now have a pipeline that generates an API client and publishes it to a NuGet feed. You can now use this package in your application! A way to improve this script is to generate multiple clients. Perhaps you want to also publish a TypeScript client for SPA’s or a Java/Kotlin client for your Android app, etc..
Finishing up
Thanks for reading to the end! I hope you enjoyed this post. Feel free to share it with your team or others who you think will benefit from knowing more about OpenAPI and API client generation!
Let me know if you have any questions or feedback in the comments below.
Conclusion
By using OpenAPI you’ll unlock powerful tools for API development, including API client generation with tools like Kiota, NSwag and OpenAPI generator. This makes exposing your API’s feature set and managing API clients easier, ensuring they stay in sync!
By automating this process with a script or even a CI/CD pipeline, you can ensure that your API clients are always up to date and available for others to use
Links to the demo
A lot of the code examples in this blog post are based on the demo I give in my related session. You can find the files here.