Table Of Contents
This blog post is a companion to my Keep it secret, keep it safe with .NET talk! If you are unable to visit a session of this talk, you can read this blog post instead! This way as many people as possible can learn about .NET’s configuration system and how to keep secrets safe!
My talk offers some more in-depth information, so if you want to know more, take a look at my Speaking page to see when and where I will be giving this talk again! You can also contact me if you want me to give this talk at your event!
Introduction Link to heading
If you’ve been writing code for a while, you probably have used configuration in some way. Think of feature flags, logging settings, authentication settings, etc… Maybe you’ve used a configuration file containing some settings for your application, or maybe you’ve used environment variables. Maybe you’ve used both!
It’s also likely that you interacted with secrets, which I also consider to be part of a configuration system. Think of connection strings and API keys. These should always be secure!
Configuration in .NET has changed dramatically since the introduction of .NET Core. Gone are the days of using multiple Web.config files, we now have a much more flexible system. However, a flexible system can also be a complex system. That is why I wanted to create a session and blog post in which you’ll learn how .NET’s configuration system works, and how you can use it optimally. You’ll also learn how to keep your secrets safe, both locally and in production, using the power of the Azure cloud!
This blog post contains everything that you need to know about configuration and secret management in .NET. It doesn’t cover every single detail, but it does cover everything I believe a .NET developer should know. Consider this a handy pocketguide you can fall back on, or send to others when they have questions about configuration and secret management in .NET.
I think this blog post is very useful because it takes multiple hours to find and fully read Microsoft’s documentation about these topics. If you want to learn more, you’ll find links to the official documentation at the end of this blog post.
Let’s get started!
Configuration in .NET Link to heading
.NET’s configuration system is very flexible! You can use multiple configuration providers, each one possibly having a different configuration format:

An overview of .NET’s configuration system.Taken from the official docs
Other sources can be files like .xml, .ini and so much more. You can even connect your configuration system to the cloud, which we’ll do later on!
The basics Link to heading
As you can see, all your configuration can be accessed using the IConfiguration interface. With this, you can retrieve your values in a strongly typed manner. An example:
public IConfiguration Configuration { get; set; }

public string GetApiKey()
{
    // GetValue<> allows you to pass in the return type
    string method1 = Configuration.GetValue<string>("ApiKey");

    // The indexer variant always returns a string
    string method2 = Configuration["ApiKey"];

    return method1;
}
You’ll notice that we are not specifying what provider should be used to retrieve the ApiKey. This is because it shouldn’t matter; IConfiguration hides all this complexity from us and thus creates flexibility. The configuration system decides what provider to use based on the order of the providers. We’ll talk more about that later!
Access structured data Link to heading
A very powerful feature of .NET’s configuration system is that it supports structured data. This is very useful because it allows you to group related configuration values. All providers support structured data, but if you’ve ever worked with an ASP.NET Core project, you’ll likely recognize the most common one, which is appsettings.json. The following JSON is an example of such a file:
{
  "Logging": {
    "LogLevel": {
      "Default": "Information",
      "Microsoft.AspNetCore": "Warning"
    }
  },
  "AllowedHosts": "*",

  "ConnectionStrings": {
    "Database": "CONNECTIONSTRING_HERE"
  },

  "Features": {
    "EnableNewUI": false
  }
}
You can imagine the root object and the Logging, ConnectionStringsand Features sections as “structured data”.
To interact with these sections in .NET you can use the following code.
public IConfiguration Configuration { get; set; }

// ...

public IConfigurationSection GetFeaturesSection()
{
    // GetSection returns null when the section can't be found
    var method1 = Configuration.GetSection("Features");

    // GetRequiredSection throws when the section can't be found.
    // ALWAYS prefer this over GetSection to prevent nasty bugs!
    var method2 = Configuration.GetRequiredSection("Features");

    return method2;
}

public bool GetEnableNewUI()
{
    return Configuration.GetValue<bool>("Features:EnableNewUI");
}
IConfigurationSection provides the same API as IConfiguration, so you could call featuresSection.GetValue<bool>("EnableNewUI") to get the value of that section. You can also directly access a configuration value that exists inside a section using a :, which you can see in use in the GetEnableNewUI method.
EnableNewUI using an environment variable, you’ll have to create one named Features__EnableNewUI.How does this all work? Link to heading
We’ve been using IConfiguration in some examples now. You might be wondering how this all works under the hood; how do you create an instance of IConfiguration, and how do you set it up? Let’s take a look!
To create an instance of IConfiguration, you’ll need to use the ConfigurationBuilder class (or another class that implements IConfigurationBuilder).
This class uses the Builder pattern so you can add multiple providers. In the end, you call Build() and end up with an IConfigurationRoot. This is the same thing as IConfiguration, but it also has a list of all the providers you added. You should never use IConfigurationRoot directly because you shouldn’t access the providers under the hood. An example:
var builder = new ConfigurationBuilder();

builder.AddJsonFile("sharedsettings.json");
builder.AddJsonFile("appsettings.json");
builder.AddEnvironmentVariables();
// And so on...

IConfigurationRoot configuration = builder.Build();
The order of these providers is very important because it’s a layered system. Take a look at the following image:

An overview of the importance of the order of configuration providers.ASP.NET Core in Action, Second Edition (Permission granted by author Andrew Lock)
Imagine that sharedsettings.json has a value for all the configuration values used by the application. appsettings.json and the Environment variables both contain a subset of these values. Because the provider for the environment variables was added last, it has the highest priority. So if you want to retrieve a configuration value called ApiKey, the system will first look at the environment variables. If it exists, it will be returned, even if other providers also contain a value for ApiKey. However, if the environment variables do not contain a value for ApiKey, it would move on to the provider that was added before it and search there, and so on.
The defaults Link to heading
You might be a little confused at this point. I sure was when I learned about IConfigurationBuilder and the importance of those layers. Why? Well, I realized that I had been using IConfiguration in lots of projects, but I had never heard of IConfigurationBuilder before. So how could I have been using IConfiguration?
This works because if you work on a .NET application that
uses a Host, it will set up an entire configuration system for you by default! For example,
ASP.NET Core projects and
worker services use a Host, so in most projects this will be done for you! We’ll now take a look at how that works.
In a standard ASP.NET Core application, the following is set up for you.
| Provider | Example | Notes |
|---|---|---|
| appsettings.json | { "Key": "default value" } | |
| appsettings.{ENVIRONMENT}.json | { "Key": "development value" } | |
| User Secrets (Development) | dotnet user-secrets set "key" "development value" | Can also be set in IDE’s. |
| Environment variables | Powershell:setx key "environment value"Bash: export key="environment value" | Can also be set in IDE’s. Very popular with Docker/Kubernetes deployments. |
| Command line arguments | dotnet run --key "important value" | Can also be set in IDE’s. |
The item on the top has the lowest priority. So if you were to call Configuration["key"], you would get important value as a result, even though User Secrets also provide a value.
Visual Studio (and other IDE’s like JetBrains Rider) support setting environment variables/command-line arguments in your IDE when you go to the properties of the project. However, I advise against using this during development. I never use environment variables or command line arguments during development because it’s more difficult to edit these than simply opening a file. Storing them in appsettings.Development.json (which will be covered next) is more convenient for you and your colleagues.
Configuration and Environments Link to heading
The appsettings.{ENVIRONMENT}.json provider is a bit different than other providers. This is because this is dependent on
the environment of the application. The current environment of the application is read from the value of the DOTNET_ENVIRONMENT or ASPNETCORE_ENVIRONMENT environment variable. If your project is not an ASP.NET Core project, the application will only check DOTNET_ENVIRONMENT. ASP.NET Core projects fall back to DOTNET_ENVIRONMENT when ASPNETCORE_ENVIRONMENT doesn’t exist.
The environment will be regarded as Production when these environment variables do not exist.
When you create an ASP.NET Core project, a file called launchSettings.json will be created in the Properties folder. In here, you can see that the ASPNETCORE_ENVIRONMENT environment variable is set to Development:
{
  // Lots of other fluff has been removed from this file for the sake of brevity
  "$schema": "https://json.schemastore.org/launchsettings.json",
  "profiles": {
    "MY_PROJECT": {
      "commandName": "MY_PROJECT",
      "applicationUrl": "https://localhost:7237;http://localhost:5292",
      "environmentVariables": {
        "ASPNETCORE_ENVIRONMENT": "Development"
      }
    }
  }
}
The result of the configuration system working together with the application’s environment results in a very powerful feature because it allows you to create different configuration files for each environment.
You can store default values in appsettings.json, and override them in appsettings.Development.json, appsettings.Test.json, appsettings.Staging.json and appsettings.Production.json.
For example, let’s say you’ve finished the new design for a checkout page of a webshop. It must still be tested and reviewed by others in a test environment, but it shouldn’t go live on production yet. This sounds like a perfect use case for feature flags! You could create a feature flag called EnableNewCheckoutUI and set it to false in appsettings.json as the default value. Then, you could override these values in appsettings.Development.json and appsettings.Test.json so they are only enabled there:
// appsettings.json
{
  "FeatureFlags": {
    "EnableNewCheckoutUI": false
  }
}

// appsettings.Development.json and appsettings.Test.json
{
  "FeatureFlags": {
    "EnableNewCheckoutUI": true
  }
}
You aren’t limited to the aforementioned environment names; they are just the defaults that .NET uses. If you want to use a different name, you can do so by setting the ASPNETCORE_ENVIRONMENT environment variable to the name of your choice, and then create a corresponding appsettings.ENV_NAME.json file. The only other thing you need to do is to ensure that the environment you run your application on has ASPNETCORE_ENVIRONMENT or DOTNET_ENVIRONMENT set to the correct value.
Treating configuration as code Link to heading
Previously, I praised .NET’s configuration system and IConfiguration for being flexible and feature-rich. I talked about its support for structured data and retrieving values from a deeper configuration hierarchy. But did you know you can do a lot more with structured data?
Let’s say our application talks to an external API using HTTP. To do so, we need an ApiUrl, ApiKey and perhaps we want to configure a TimeoutInMilliseconds. From a code perspective, we might want to store these values in a class (or record) because they belong together:
public class ExternalApiSettings
{
    public string ApiUrl { get; set; }
    public string ApiKey { get; set; }
    public int TimeoutInMilliseconds { get; set; }
}
Next, we would have an ExternalApiClient class which uses configuration and the class we just created:
public class ExternalApiClient
{
    private readonly IConfiguration _configuration;

    public Foo(IConfiguration configuration)
    {
        _configuration = configuration;
    }

    public void CallExternalApi()
    {
        IConfigurationSection externalApiSettingsSection = _configuration.GetRequiredSection("ExternalApiSettings");

        // Method 1 (Get<TType>() grabs the values from that section and maps them into a new instance of the provided class)
        ExternalApiSettings settings1 = externalApiSettingsSection.Get<ExternalApiSettings>();

        // Method 2 (Bind() expects an existing instance of a type and will map the values into that existing instance)
        ExternalApiSettings settings2 = new();
        _configuration.GetRequiredSection("ExternalApiSettings").Bind(settings2);

        // Do something with these settings here..
    }
}
This looks pretty neat, right? Instead of performing 3 calls to grab each API-related configuration property individually, we can map them into a strongly typed object. We can now treat our configuration as code! We could even create methods on our ExternalApiSettings class to make it even more powerful!
But, there are some big downsides with this approach.
Downsides Link to heading
- The first downside is that our
ExternalApiClientrequires an instance ofIConfigurationto function. That’s a pretty big dependency and pretty wasteful, considering it only uses 3 configuration values! Also, this class can now access other configuration values like a connection string to a database, logging settings, feature flags, etc., even though it doesn’t need this information. - The second downside is that this class is violating the Single Responsibility Principle. It’s not only responsible for calling the external API, it’s also responsible for interacting with the configuration system to be able to call this external API.
- Because this class interacts with the configuration system directly, it has a dependency on its structure and is thus tightly coupled. Any changes to the
ExternalApiSettingsconfiguration section (like the name or the names of its children) would cause issues at runtime.
So, what can we do about this? Rewrite it in Rust 🦀? No, we can use the options pattern!
Options pattern Link to heading
The options pattern allows you to make even better use of .NET’s configuration system 🚀! It allows you to decouple your application from the configuration system and adds a lot of powerful features to said system, like:
- Dependency Injection
- Validation
- Different configuration lifetimes
- And much more!
To start using the options pattern effectively, you need to create classes/records of your configuration sections. We had already done so in the previous example, so let’s continue with that:
public class ExternalApiSettings
{
    public string ApiUrl { get; set; }
    public string ApiKey { get; set; }
    public int TimeoutInMilliseconds { get; set; }
}
Dependency injection Link to heading
The options pattern works very well together with dependency injection! To do so, simply register your options class/record in the service collection. Depending on your project, your entry point for this might be the Startup.cs -> ConfigureServices(IServiceCollection services) method, or somewhere in your Program.cs.
services.Configure<ExternalApiSettings>(configuration); // Pass in an existing instance of IConfiguration
This will add an instance of IOptions<ExternalApiSettings> to your dependency injection container. To see the benefits of this approach, let’s take a look at how we could improve our ExternalApiClient from before:
public class ExternalApiClient
{
    private readonly ExternalApiSettings _externalApiSettings;

    public ExternalApiClient(IOptions<ExternalApiSettings> options)
    {
        // Important: The Options pattern is 'lazy'. This means that the options are only mapped when you request them by calling .Value!
        // This is only done once, so you don't have to worry about performance.
        _externalApiSettings = options.Value;
    }

    public void CallExternalApi()
    {
        // Do something with these settings here..
    }
}
This has removed all the downsides from before! Our ExternalApiClient no longer has a dependency on IConfiguration and is no longer coupled to the configuration system. It also no longer has to worry about the structure of the configuration system.
You might argue that we have an indirect dependency on the configuration system because of the .Configure<>(configuration) call from before, but you aren’t required to use this method to set up your options. You can create an instance of IOptions<T> using Microsoft.Extensions.Options.Options.Create() if you need to create an instance manually, and you can pass in any data you want. You can even create options based on other dependencies by using the Configure<TDep1,...>() method from the OptionsBuilder, which will be discussed next.
IOptions<> interface. This is because this allows you to use some more advanced features we’ll talk about next.Validation Link to heading
My favorite feature of .NET’s configuration system is how easy it is to validate your configuration! I believe this is one of the most important parts of any application, and I do not see it being used enough. The reason why I believe configuration is one of the most important parts of any application is because it houses very important settings of your application.
An incorrectly configured application could have disastrous results. Worst case, imagine if your test environment is accidentally connecting to production environment resources. Now imagine that you would test a mass-delete function, and accidentally delete all your production data. That would be a disaster!
That is why we want to validate our configuration. If our application starts with an incorrect configuration system, we want to exit immediately.
So how do we set this up? It’s easier than you think. I like using
Data Annotations for my options validations when I don’t require complex validation rules, so let’s modify our ExternalApiSettings like this:
public class ExternalApiSettings
{
    [Required] // If the ApiUrl is not set, the configuration is invalid
    public string ApiUrl { get; set; }

    [Required] // If the ApiKey is not set, the configuration is invalid
    public string ApiKey { get; set; }

    [Range(1, 1_000_00)] // If the TimeoutInMilliseconds is not set (Default is 0) or bigger than 100000, the configuration is invalid
    public int TimeoutInMilliseconds { get; set; }
}
Now, let’s change the way we register those options in the dependency injection container:
services
    .AddOptions<ExternalApiSettings>()
    .BindConfiguration("ExternalApiSettings")
    .ValidateDataAnnotations() // Throws an OptionsValidationException if the configuration is invalid
    .ValidateOnStart(); // Highly recommended!
Instead of using Configure<TType>(configuration), we now use AddOptions<TType>(). This returns an OptionsBuilder and allows us to use some powerful methods.
- The first one we use is
BindConfiguration(). This will retrieve theIConfigurationfrom the dependency injection container and bind the section that we pass in. This is handy because we don’t have to manually pass in our configuration anymore. - Next, we call
ValidateDataAnnotations(). This will validate our configuration section based on the attributes we set on the properties.- Note: You need to install the Microsoft.Extensions.Options.DataAnnotations nuget package if you don’t have this method available to you.
- Finally, we call
ValidateOnStart(). This one is very important! By default, your options would only get validated when you call.Valueon them somewhere, like in a class where they are injected. This means that your application would NOT throw an error and exit on startup when your configuration is invalid!ValidateOnStart()will validate your configuration after your application is done bootstrapping itself.
You can validate your code in many other ways, as well. You can use the IValidatableOptions<> interface to implement complex validation logic or you can call Validate(Func<TOptions, bool> validation) to write custom validation logic as part of the Options builder. You could even
integrate it with FluentValidation!
Configuration lifetimes Link to heading
Finally, I want to talk about the lifetime of the Options pattern. IOptions<T> is a singleton. This means that if one of your
configuration providers would be updated at runtime, the options will not be updated. This is because the options are only mapped once when you call .Value on them.
You could consider this a good thing because it means that your application will not suddenly change behavior when your configuration changes.
However, you could also say it’s a bad thing because you might not want to have to redeploy or restart your application when you change your configuration. In that case, you want to use IOptionsSnapshot<T> or IOptionsMonitor<T> instead.
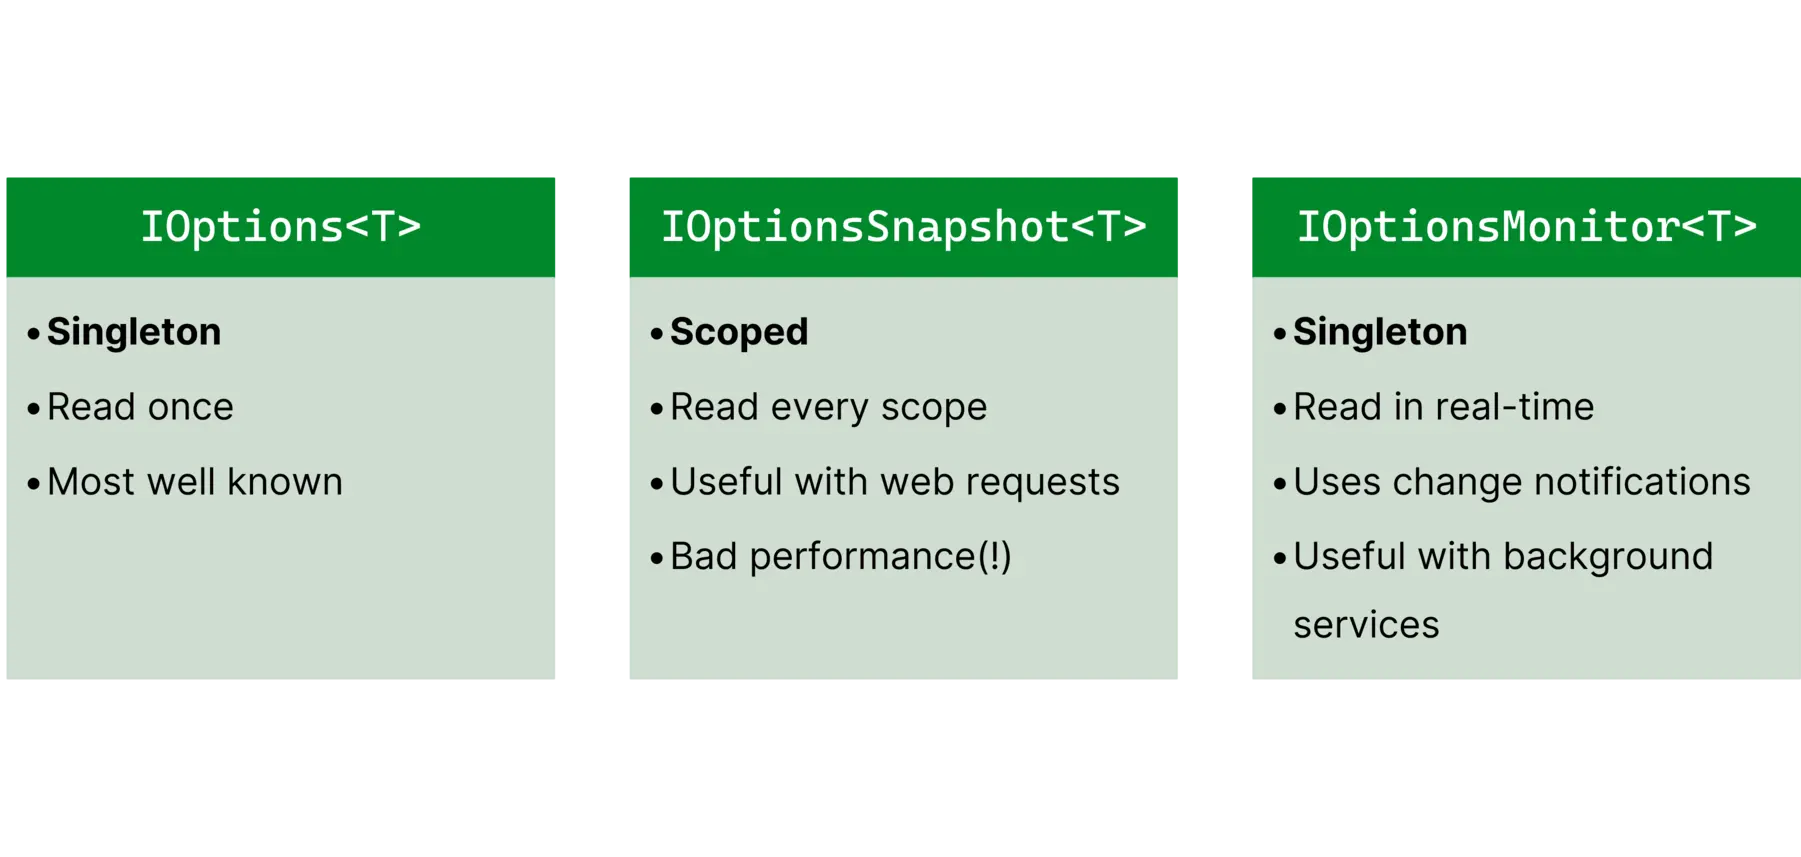
Overview of the capabilities of IOptions, IOptionsSnapshot and IOptionsMonitor
IOptionsSnapshot
Link to heading
Instead of injecting IOptions<T> into one of your classes, you could inject IOptionsSnapshot<T> instead. This will reload that particular options type every for
scope. A scope in .NET is an abstract term. A scope could be an HTTP request, for example. So for each HTTP request it would reload the options and they would stay consistent for that entire request. This means that if you change your configuration, it will only be updated in a new request.
IOptionsSnapshot<T> can result in
bad performance.IOptionsMonitor
Link to heading
IOptionsMonitor<T> doesn’t work with scopes. Instead, you have to call .CurrentValue (instead .Value) on it to retrieve the current version. You need to be careful with how you access your configuration, though! Imagine a scenario where your configuration changes in the middle of an HTTP request. Calling .CurrentValue at the beginning and end of a request would result in different values, which creates a synchronization risk. You can register a callback using OnChange() to be notified of these events.
This interface is most useful in a background job scenario that is only instantiated once but would benefit from being able to handle configuration changes.
Secret management during development Link to heading
If you’re going to take away one thing from this blog post, let it be the following:
If you store secrets in your git repository and your repository gets compromised, your secrets are compromised as well. I don’t think I need to explain why this is a bad thing, so how do we prevent this from happening with .NET?
By using the user secrets configuration provider!
The user secrets configuration provider Link to heading
I mentioned the user secrets configuration provider earlier. This configuration provider is meant for local development only. It allows you to store secrets on your local machine without having to worry about them being committed to your git repository, because they are stored in a different location:
- Windows:
%APPDATA%\Microsoft\UserSecrets\<user_secrets_id>\secrets.json - Mac & Linux:
~/.microsoft/usersecrets/<user_secrets_id>/secrets.json
This file is very similar to the appsettings.json provider. Simply insert JSON into it and you can access it with .NET’s configuration system. When your application starts up and your ASPNETCORE_ENVIRONMENT or DOTNET_ENVIRONMENT environment variable is set to Development, it will automatically load the user secrets configuration provider as long as your project is configured to use this provider.
secrets.json file is not encrypted. If you work in an environment where storing secrets on the machine itself is risky, consider using
an external secret store like the Azure KeyVault during development.This configuration provider can be accessed using the CLI or your favorite IDE. You might need to install the
Microsoft.Extensions.Configuration.UserSecrets package in case you don’t use a Host or have a custom configuration setup.
Using user secrets Link to heading
CLI Link to heading
You can use the dotnet cli to interact with user-secrets by opening a terminal in the directory where your project’s *.csproj resides.
# Only required when user-secrets aren't initialized yet
dotnet user-secrets init

# You can use structured data by using a colon (:) to separate the keys
dotnet user-secrets set "ConnectionStrings:Database" "Data Source=..."
dotnet user-secrets set "AdminPassword" "hunter2"
# Other commands like "list", "remove" and "clear" are also available
Visual Studio Link to heading
Right-click on a project in the Solution Explorer and select Manage User Secrets. A secrets.json file will open where you can insert your secrets.
Visual Studio Code Link to heading
Install the
.NET Core User Secrets Visual Studio Code extension. Then you can right-click on a *.csproj file and select Manage User Secrets. A secrets.json file will open where you can insert your secrets.
JetBrains Rider Link to heading
Right-click on a project in the Solution Explorer and select Tools > Manage User Secrets. A secrets.json file will open where you can insert your secrets.
Setting up a project that uses user-secrets Link to heading
One downside of using user secrets during development is that - if your project requires some secrets to run - you will need to perform some setup steps after cloning the project. I have 2 recommendations for handling this:
- You could create a script that retrieves the secrets from your secret storage location and then stores them in user-secrets by piping those values into
dotnet user-secrets set. Now you only need to run this script once after cloning the project and you’re done! - Alternatively, I recommend updating your
README.MDby including setup instructions that tell the user what user-secrets to set and where to retrieve those values from. Feel free to link to this blog post if you want to explain what user-secrets are 😉.
My template for configuration management Link to heading
Now that we’ve covered the basics and advanced usage of .NET’s configuration system and how to incorporate local secret management, I’d like to showcase my “setup” for configuration management in a .NET project. When I create a new .NET project, I use the following setup:
appsettings.json Link to heading
.NET’s configuration system allows you to be very flexible with all the different providers. This is great, but can also cause confusion when your application is using configuration values you weren’t expecting, or when you can’t figure out where a specific configuration value is coming from.
Use the IConfigurationRoot.GetDebugView() method when you’re having issues with configuration values. To do this, obtain an IConfiguration instance, cast it to IConfigurationRoot and inspect the result of GetDebugView().
For more information, see Andrew Lock’s fantastic blog post about this.
I use appsettings.json to store a template of all the configuration values my project uses and where the values are retrieved from. This file may also contain actual values when the appsettings.json file is the only provider for that configuration value. I really like this setup because it allows me to see all the configuration values my project uses in one place.
{
  "Logging": {
    "LogLevel": {
      "Default": "Information",
      "Microsoft.AspNetCore": "Warning"
    }
  },

  "ConnectionStrings": {
    "Database": "<from-azure-keyvault>" // The Azure Key Vault will be discussed in the next section
  },

  "ExternalApiSettings": {
    "ApiUrl": "<from-environment-variables>",
    "ApiKey": "<from-azure-keyvault>",
    "TimeoutInMilliseconds": 5000
  }
}
appsettings.Development.json Link to heading
Next up, we have the appsettings.Development.json file. This file can contain configuration values that override values from appsettings.json, like logging settings. Furthermore, this file will and should never contain secrets! Instead, it references the user secrets configuration provider. This makes it less likely for people to insert secrets into this file because they get nudged towards using the user secrets configuration provider.
{
  "Logging": {
    "LogLevel": {
      "Default": "Debug", // Logging settings are 100% personal preference, feel free to use whatever you like
      "Microsoft.AspNetCore": "Warning"
    }
  },

  "ConnectionStrings": {
    "Database": "<from-user-secrets>" // Every developer can use their own local database connectionstring
  },

  "ExternalApiSettings": {
    "ApiUrl": "dev.externalapi.example.com",
    "ApiKey": "<from-user-secrets>"
    // I do not provide a value for TimeoutInMilliseconds because I'm fine with the value from appsettings.json
  }
}
User secrets Link to heading
Finally, I use the user secrets configuration provider for storing local secrets and overriding non-secret configuration that I don’t want to commit to the git repository, like changing the logging settings in case I need to dive deeper into a bug. If I were to change these configuration values in the appsettings.Development.json file, I would have to remember to revert these changes before committing my code. By using the user secrets configuration provider, I don’t have to worry about this.
{
  "Logging": {
    "LogLevel": {
      "Microsoft.AspNetCore": "Information"
    }
  },

  "ConnectionStrings": {
    "Database": "Data Source=..."
  },

  "ExternalApiSettings": {
    "ApiKey": "abc123def456ghi7"
  }
}
Using Azure to store configuration Link to heading
Now that we know how to store configuration and secrets locally, it’s time to talk about running your applications in real environments. There are many different ways to set up configuration and secret management for non-local environments, so it all comes down to knowing the upsides and downsides of those approaches and choosing what works best for you. In this blog post, you will learn how to use Azure to store your configuration and secrets securely.
Even though this section is about Azure, the concepts apply to other cloud providers as well. AWS’s equivalent of Azure App Configuration is called AWS Systems Manager Parameter Store. Azure Key Vault has an AWS equivalent called AWS Secrets Manager and Google’s equivalent is called Google Secret Manager.
If you want to self-host your secret management, take a look at Hashicorp Vault.
Storing secrets in Azure Key Vault Link to heading
As we said before, you can’t use the User Secrets configuration provider in non-local environments. So we have to find a different way to store our secrets when we are deploying our applications. Azure Key Vault is a great service for storing secrets, keys and certificates in a cheap, easy and secure way.
At the beginning of this blog post, I mentioned that it is possible to connect .NET’s configuration system to the cloud, which is possible with the Key Vault. This is a great approach for secret management because you can simply treat the Key Vault as a configuration provider and no longer need to do complicated things in your release pipeline.
To add it as a configuration provider, install the
Azure.Extensions.AspNetCore.Configuration.Secrets and
Azure.Identity packages. Then you only need to add a few lines of code to your Program.cs when you create a minimal API, for example:
using Azure.Identity;

var builder = WebApplication.CreateBuilder(args);

builder.Host.ConfigureAppConfiguration((context, config) =>
{
    if (!context.HostingEnvironment.IsDevelopment())
    {
        var keyVaultUrl = new Uri(context.Configuration.GetValue<string>("KeyVaultUrl"));
        config.AddAzureKeyVault(keyVaultUrl, new ManagedIdentityCredential()); // Other credential options are available. Managed Identities will be covered in a bit!
    }
});
The Key Vault is now added as the final provider and thus has the highest priority. So even if other providers have a value configured for a secret, the Key Vault will be used instead!
--) instead of 2 underscores or a colon because of naming limitations. For example, ExternalApiSettings--ApiKey instead of ExternalApiSettings:ApiKey or ExternalApiSettings__ApiKey.Using the Key Vault during local development Link to heading
Earlier in this blog post, I briefly mentioned that you might be in a scenario where you can’t store secrets on your machine because of security reasons, for example. In this case, using the Key Vault during local development would solve that problem. You can grab the code example from the previous section and modify it as follows:
using Azure.Identity;

var builder = WebApplication.CreateBuilder(args);

builder.Host.ConfigureAppConfiguration((context, config) =>
{
    var keyVaultUrl = new Uri(context.Configuration.GetValue<string>("KeyVaultUrl"));
    config.AddAzureKeyVault(keyVaultUrl, new DefaultAzureCredential()); // These credential types will be covered next!
});
Now your application will always connect to the Key Vault, even during development. The result is that you do not need to store secrets on your machine anymore because they are always retrieved from the Key Vault. A downside of this approach is that you always need an internet connection to connect to the cloud!
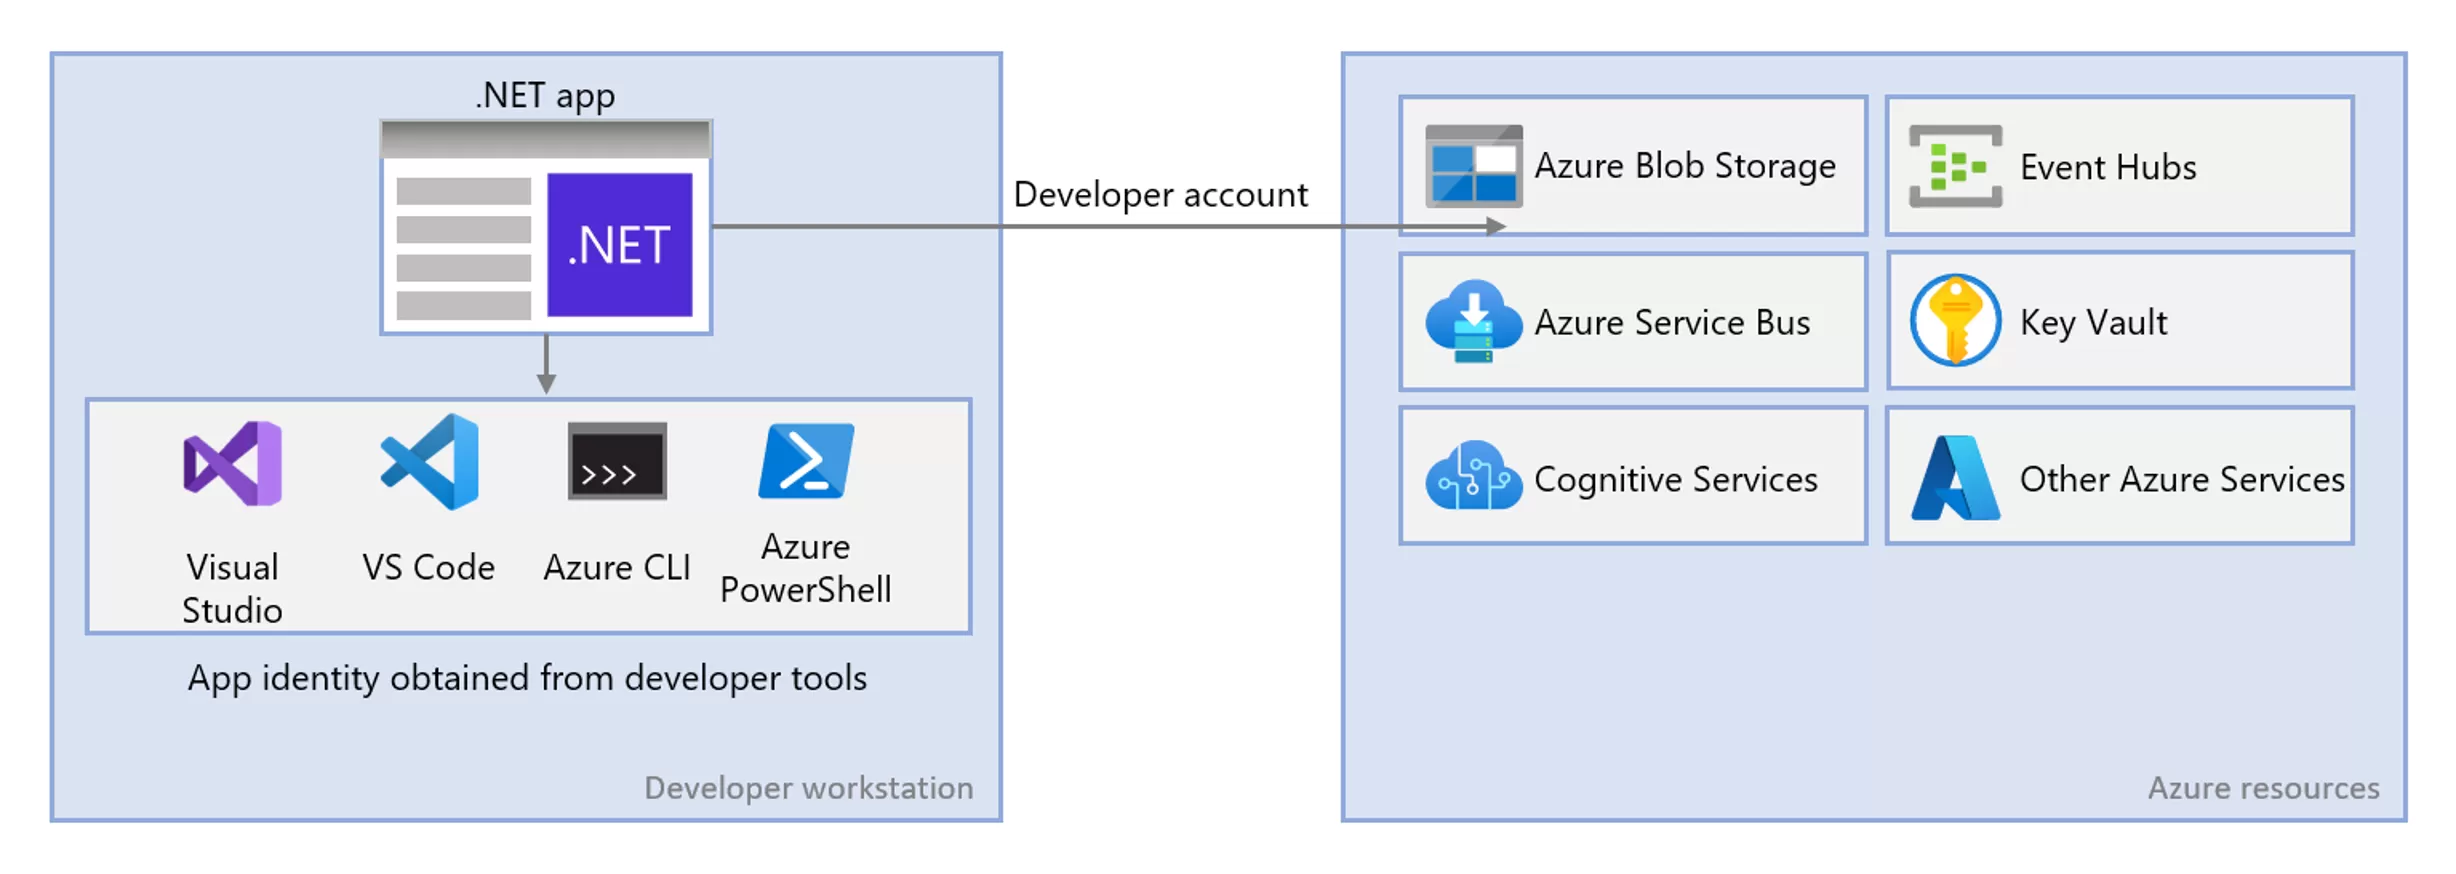
Connecting to Azure with Managed Identities Link to heading
In the previous code examples, you’ve seen some weird credential types: ManagedIdentityCredential and DefaultAzureCredential. Before we discuss this, consider the following:
We want to connect to a secured secret storage provider to obtain secrets to run our application with. To connect to this provider, we’ll need to pass in some credentials so the provider can authorize our request. But those credentials are also secrets, so where do we store those? We could store them in another configuration provider, but doesn’t this defeat the whole purpose of having a secret provider? If those credentials were to leak, someone would be able to access our secrets anyway! To summarize, we’re dealing with a chicken and egg problem here.
Luckily, some smart folks at Microsoft have figured it out! For local development, you can use the DefaultAzureCredential to communicate with Azure services. This credential type will try to authenticate
using multiple methods, like the Microsoft account you’re logged into your IDE with, your Azure CLI (az) credentials, and more.
Azure Identity uses several methods to authenticate a developer’s Azure account.
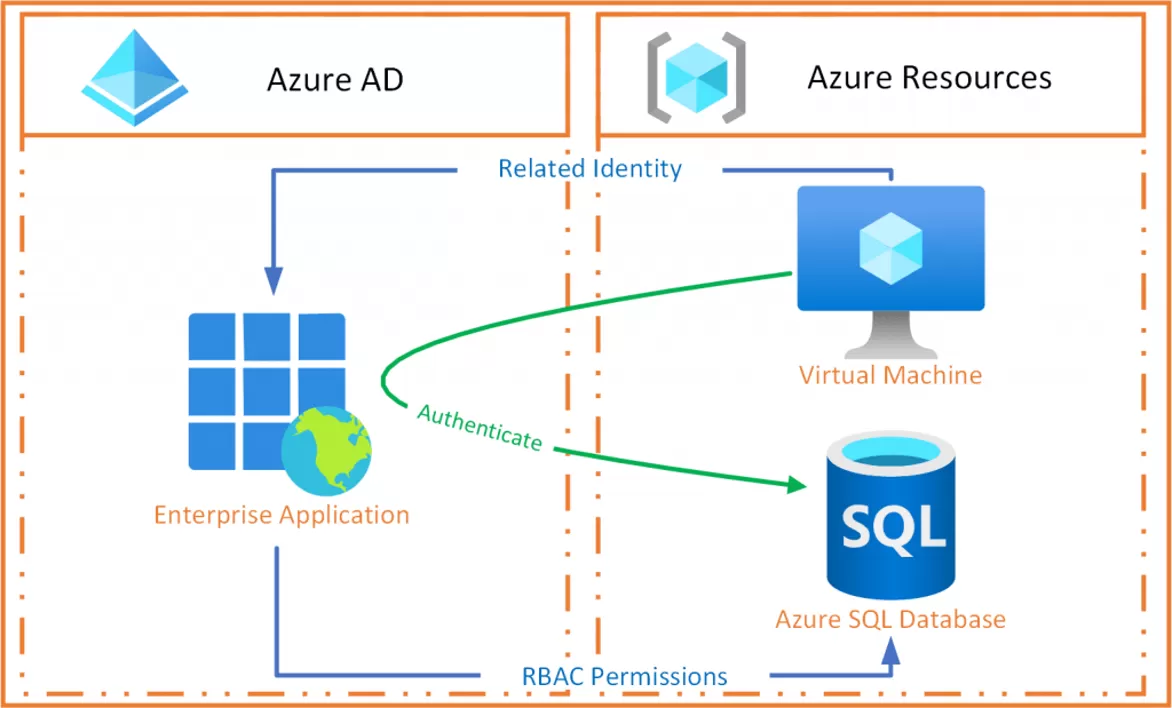
For production environments, Microsoft recommends Managed Identities to authenticate with Azure resources. Managed Identities are a feature of Microsoft Entra (Formerly known as Azure Active Directory) that allows you to create an identity for your application in Microsoft Entra. This identity can then be used to authenticate with other Azure services, like the Key Vault. The benefit of this approach is that you don’t need to store any credentials in your application anymore because the identity is managed by Azure AD.
Storing configuration in Azure App Configuration Link to heading
Last but not least, I want to talk about Azure’s cloud offering for configuration management. Whilst Azure Key Vault covers secret management, Azure App configuration is a SaaS offering that will help you with managing your configuration. Both of these services work very well together when you link your Azure App Configuration to your Azure Key Vault. If you choose to use this service, you’ll only need to add the Azure App Configuration as a configuration provider and then you’ll be able to use .NET’s configuration system to access all your configuration AND secrets from the cloud!
It also has many other features, so it’s worth checking out!
Finishing up Link to heading
You made it to the end! This blog post took a very long time to write, and I’m glad it’s finally done! Below you can find some more information if you want to learn more about the concepts I covered in this post. If you have any questions, feel free to leave a comment below. If you’d like to know when and where I’ll be giving the talk version of this blog post, check out my Speaking page.
Links to the demo Link to heading
I mentioned that the blog post is a session companion to one of my sessions. This session contains several demos that showcase the concepts discussed in this blog post. You can find the demos here.
Links to the official documentation Link to heading
- Configuration
- Configuration (ASP.NET Core specifics)
- Options Pattern
- User secrets
- Azure KeyVault
- More information about Managed Identities
Did you enjoy this post?
