
The beautiful image above sadly isn’t my work setup, but with this blog post you can make yours look as cool by connecting to your work laptop remotely 😉! Photo by Amr Taha™ on Unsplash.
Table Of Contents
Introduction Link to heading
At the time of writing this blog post, I am working at Arcady, a Dutch IT consultancy firm based in Zwolle. Because I work in consultancy, I can be stationed at different companies to help them out with their software. Some of these companies hand out their own company-governed laptops to improve security and to not require their employees to use personal hardware.
For people in consultancy like me, having multiple devices can be inconvenient. With the rise of WFH, people use these laptops at home, even though they possibly have a more convenient/powerful setup in their home office. For example, multiple monitors, a good webcam, microphone, keyboard and mouse, etc..
To prevent having to plug cables into different machines each day, some companies hand out docking stations so you simply plug all the hardware into the dock and connect a single USB cable to the laptop. But this is not ideal. For example, it’s always a puzzle to figure out if these docks will be able to handle your monitors at their highest resolutions and framerates, and power other peripherals at their full power.
But.. even if you are provided with a docking station, you might still have a problem (like I did). I have my own PC under my desk, which is a lot more powerful (and convenient) than any laptop. Even if I was provided a docking station with enough USB slots to handle my entire setup, I would still need to plug the docking station cable into my PC every time I would want to use my own PC. This can be very annoying. Not to mention that without a docking station, you’d have to do this every work-day with individual cables!
In this blog post, I will show you how you can securely control any laptop wirelessly using a more powerful PC, while also using your own peripherals (monitors/webcam/microphone/etc.) AND without encountering any of the mentioned downsides!
There are lots of blog posts about this topic on the internet, but this post will go further than those by also giving lots of tips to improve your workflow and make RDP a better experience!
RDP (Remote Desktop Protocol) Link to heading
Right off the bat, i want to say that RDP is one of many possible solutions. RDP is mostly focused on Windows), but other remote desktop solutions exist (like vnc). I have only used RDP extensively, so I will only cover that in this post. Leave a comment below if you would like to see a blog post about other remote desktop solutions!
RDP is a protocol that allows you to connect to a Windows machine using another computer. You can then control that machine using your own computer’s hardware. This means that you can simply have your work laptop in a corner in a room somewhere, and ONLY use your main setup to do all the work on. Because you only control the laptop, all the work you do happens and stays on said laptop.
As far as I know, every “normal” Windows PC has RDP installed. This blog post will be written for Windows 10, but I looked at how this would work in Windows 11 and it’s basically the same.
Now, before we begin: If any of these steps don’t work, take a look at the troubleshooting section!
Let’s get started!
Configuring the network Link to heading
This blog post will only cover connecting to a laptop that is on the same local network! I strongly discourage allowing connections from the internet because of security reasons. To set up something like this, I would recommend using a virtual private network like Tailscale or other solutions.
First, we need to be sure that both devices are on the same network. I recommend that you use an ethernet cable for both devices so you get a faster connection. WiFi will also work; you won’t notice any delays, but my colleagues did say that they noticed some delay during Microsoft Teams calls. Using a wired connection resolved that issue completely!
When both devices are using the same network, you should make sure they are both set to see the network as a private network so they allow connections from other devices on the same network:

Settings -> Network & Internet -> Status -> Properties -> Select Private at “Network profile” ORSettings -> Network & Internet -> Status -> Change connection properties -> Select Private at “Network profile”
Next up, you should tell the work laptop to allow RDP connections:

Settings -> System -> Remote Desktop -> Turn “Enable Remote Desktop” on
Make sure to write down the PC name that you can see in the bottom of the picture. As you can see, mine is DESKTOP-KEDI0SQ, but the laptop I will connect to is called LAPTOP. We will use this to connect to the laptop later!
Testing the connection Link to heading
As far as I know, there are 2 ways to test and connect your remote connection.
Network tab Link to heading

This PC -> network tab -> You should see your work laptop appear -> Right click on your work laptop -> Click on “Connect with Remote Desktop Connection”
If you can’t see the laptop show up, take a look at the Troubleshooting section down belong.
Now, as you can see in the screenshot, you can click on “Connect with Remote Desktop Connection” but I recommend using the remote desktop connection section instead because that program will be used for the upcoming tips, too.
Using the Remote Desktop Connection application Link to heading
Instead of the network tab, you can also use the more advanced “Remote Desktop Connection” application which will be used for the next steps as well.
To use this application, either search for “Remote Desktop Connection” in Windows, or search for mstsc.exe which is the direct link and will always be found, regardless of language settings.
When that opens, make sure you click on “Show options” and you should see something like this:
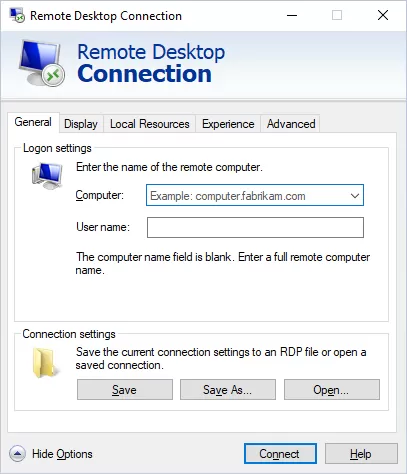
The Remote Desktop Connection program
Now, what I like to do is to click on Save As... , naming the file something like work-laptop.rdp and putting it on my desktop. That way I can simply click on that icon whenever I want to connect to the work laptop! You can then also right-click on the icon and select Edit to edit the connection settings further.
Save whenever you change any of these remote desktop connection settings! This prevents you from losing progress and ensures any changes to settings are applied before reconnecting.Making the first connection Link to heading
You should enter the PC name that you wrote down in the Configuring the network step earlier. In my case, it’s LAPTOP. You can leave the username blank; you can fill this in when authenticating in the next step.
Go ahead and save the file and click on Connect.
Most likely, you will get a warning about the publisher of the connection not being identified. Personally I simply press “Connect” and ignore this warning because I know I am connecting to my own local machine.
Now, things might get a little bit tricky. If you are connecting to a laptop that has a Microsoft account and isn’t joined to a specific domain, you should see something along the lines of MicrosoftAccount\YOUR_EMAIL_ADDRESS_HERE. If so, you should enter the password of your Microsoft account and you should be able to connect:

Enter your password here
If the laptop you connect to only has a local account, you should enter the password of that local account.
You might also connect to a laptop that is connected to an Active Directory Domain. Because this might be an edge case, you can read more about this in the Advanced Setup section.
Using your own audio/video setup on the work laptop Link to heading
Now that we can connect to the work laptop, we would like to also use all of our own peripherals. Like our webcam, microphone, speakers, headset, etc..
Luckily, this is very easy to do! Let’s go over each of these items step by step:
Audio & Microphone Link to heading
We will be using the Remote Desktop Connection program to configure this:
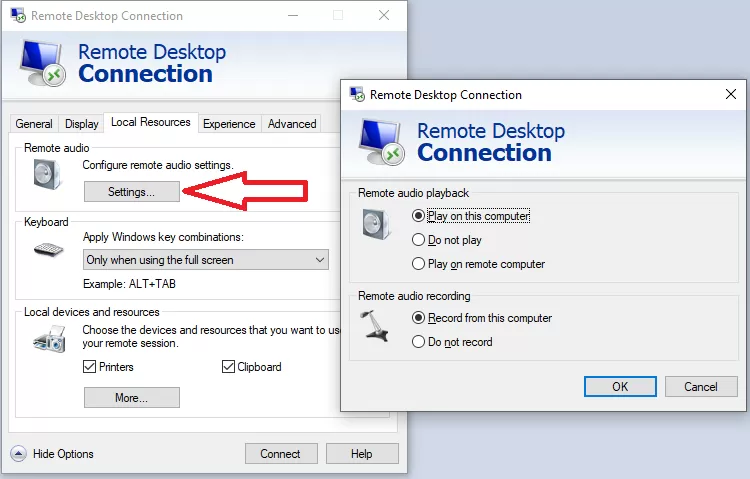
Select the “Local Resources” tab -> Remote audio Settings -> Select “Play on this computer” -> Select “record from this computer”
To test if these settings work, go ahead and save these settings, and re-connect to to your work laptop. Then open the audio settings and you should see that audio input and output are using Remote Audio. Go ahead and find a audio/video clip and test if the sound is coming out on your main PC’s audio system! You can also download an app like Windows Voice Recorder to test your microphone.
Webcam Link to heading
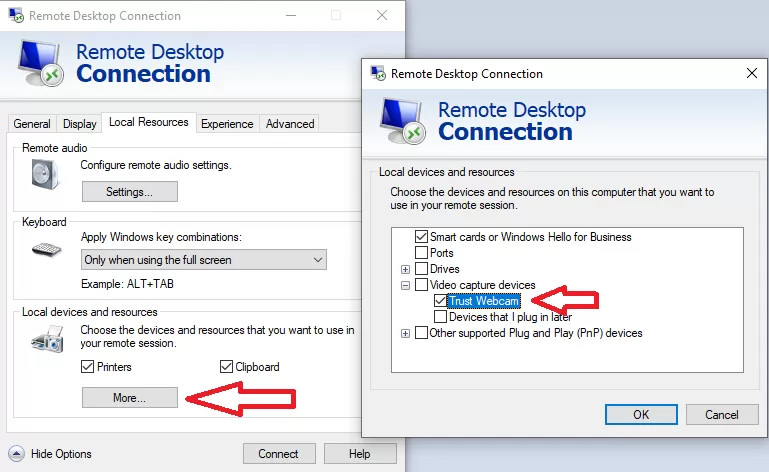
Select the “Local Resources” tab -> Click on “More…” at the “Local devices and resources” tab group -> Select your webcam in the “Video capture devices” checkbox list
Go ahead and perform the steps mentioned in the image above, and then let’s do the same as before: Save the settings and re-connect to the laptop. You can then open the Camera app or any other application that allows you to view your webcam. Please note that some applications might still use the laptop’s webcam by default. In that case, you have to go the settings of such applications and instruct them to use the remote webcam.
Using multiple monitors Link to heading
In my opinion, this is the coolest option! Even though your laptop has only 1 monitor (unless you have a way cooler laptop), it is possible to use RDP to use all the monitors that are connected to your main setup. It’s very easy to configure this:
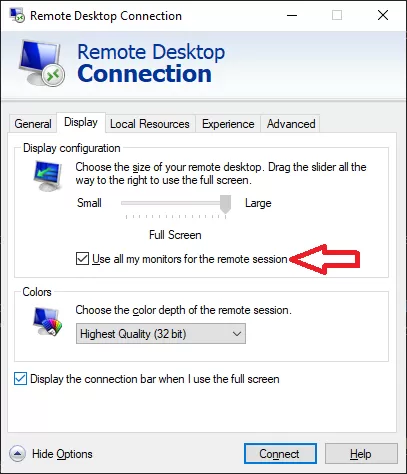
Select the “Display” tab -> Select “Use all my monitors for the remote session”
Hiding the annoying blue status bar Link to heading
Now, only 1 annoying problem remains. That very annoying blue bar on the top of the screen!

By default, it dissapears after a few seconds, but whenever you move your cursor to to top of the screen, it appears again. This is VERY annoying when you want to move some programs around or click on any icons on the top of the screen.
Luckily, it’s very simple to hide this blue bar and make it appear on the screen only when we want:
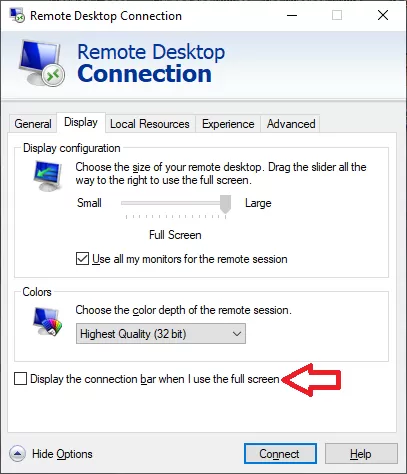
Select the “Display” tab -> Select “Use all my monitors for the remote session”
You might be wondering how to make this blue bar re-appear when you have disabled this option. That’s quite important, because you need this blue bar to minimize the remote desktop session, to close it, etc…
In order to do this, you have to press the following combination: CTRL + ALT + HOME!
Preventing the laptop from sleeping when the lid is closed Link to heading
Finally, I want to end with a tip about connecting to the laptop whilst the lid is closed. This will make it much easier to store it away somewhere. You will need administrator rights to tweak this when you do this over RDP. It’s possible you don’t have these rights, so I advise you to follow these steps on your work laptop:
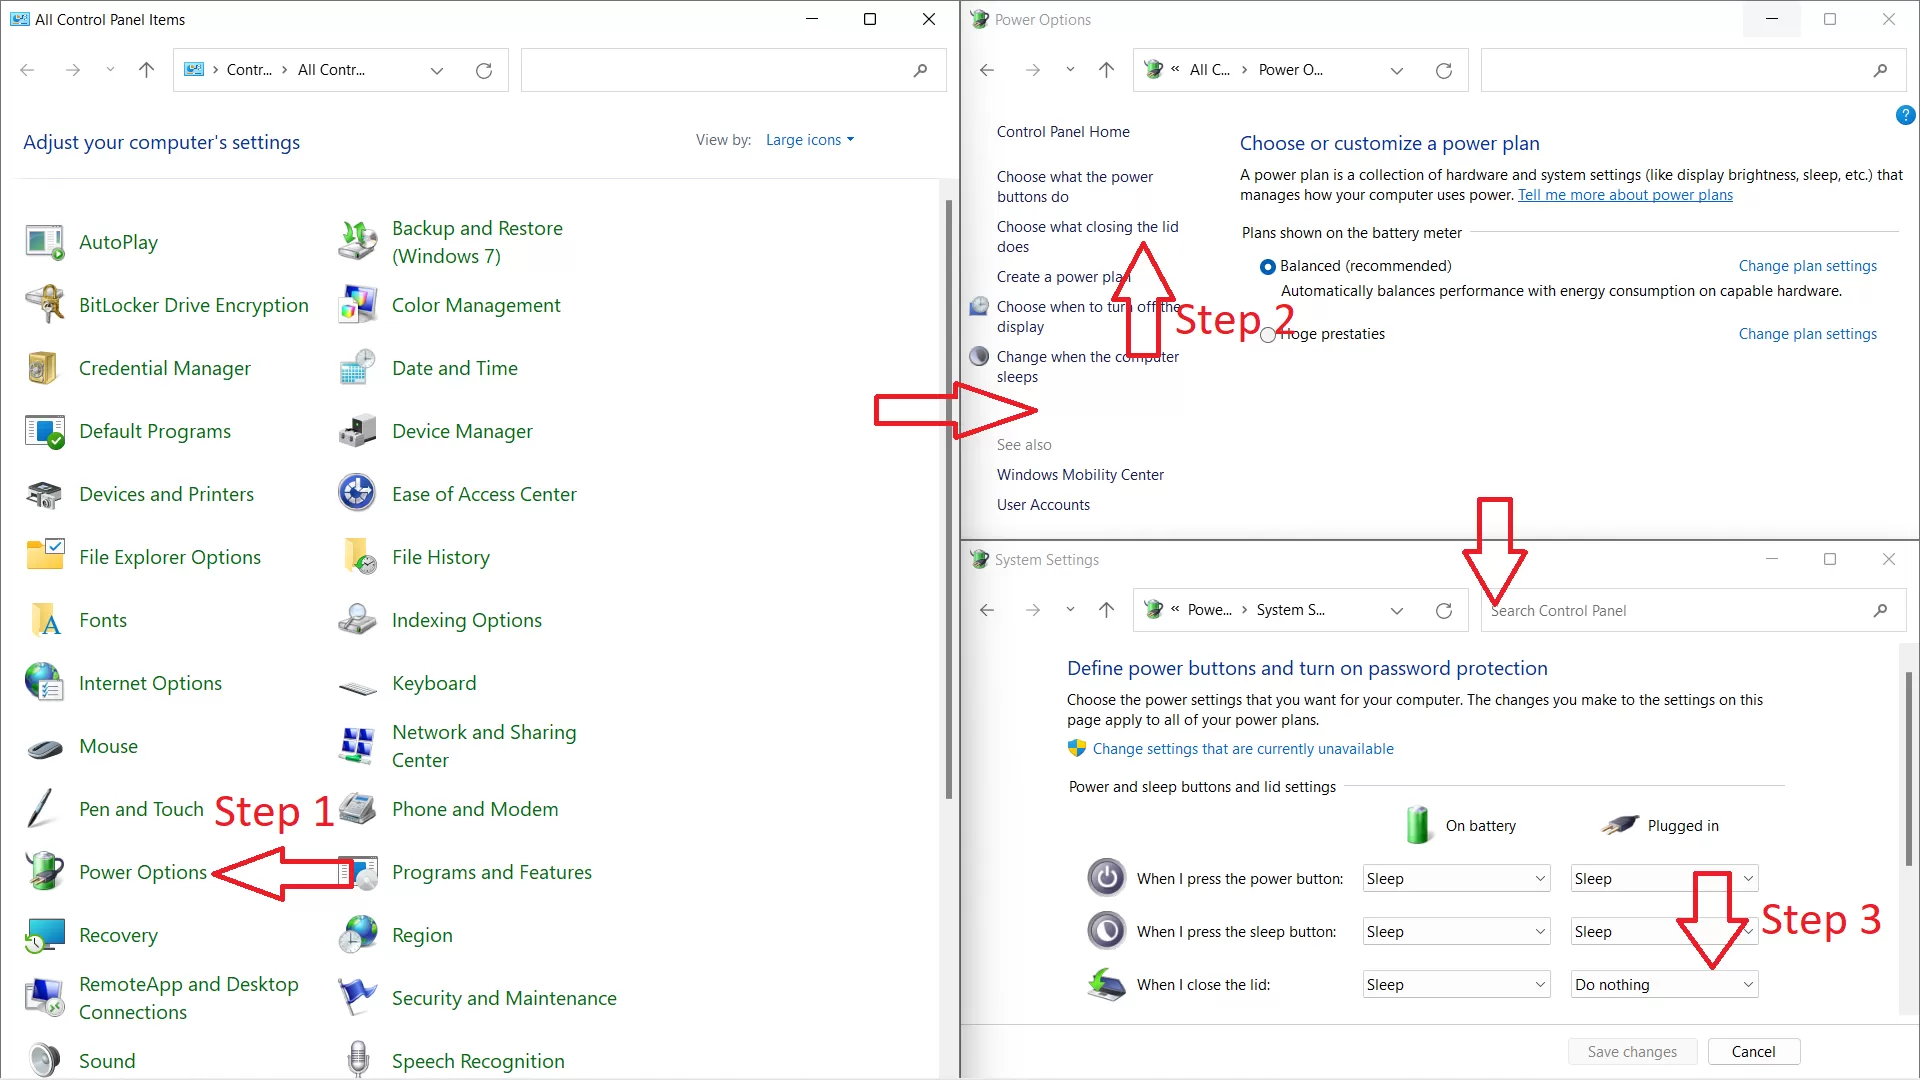
Open “Control Panel” -> Select “View by: Large Icons” -> Select “Power Options” -> Select “Choose what closing the lid does” -> Select “Do nothing” for “When I close the lid” when the device is plugged in
Note that these settings only configure the laptop to stay “on” while the lid is closed AND it’s receiving power from an outlet.
Now you can start the laptop, connect to it and close the lid!
Advanced setup Link to heading
The last tips I would like to give are a bit more advanced. A .rdp file is nothing more than bits of text. You can open it in notepad to inspect it.
So if you want to see how everything works or make some advanced changes, you can do so in notepad or any other text editing tool!
Active Directory Domain Link to heading
Your employer might use something like “Active Directory”, meaning you have a work email address which you also use to log into the laptop. In my experience, this doesn’t work as easily as logging in with a Microsoft account. These are the steps I had to follow in order to make it all work:
Open your
work-laptop.rdpfile in notepad or any other text editing program.Add the following line:
enablecredsspsupport:i:0(If the line already exists, change it). Now, try connecting again.If errors continue to occur, you might have to disable Network Level Authentication (NLA). In order to disable this, do the following. Afterwards, try connecting again.
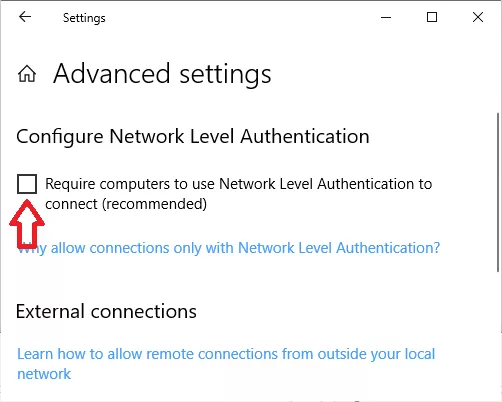
Settings -> System -> Remote Desktop -> Advanced Settings -> Turn “Require computers to use Network Level Authentication to connect (recommended)” off
- NLA is an extra security measure that only allows laptops that are on the same domain network to connect to another laptop. Because our main setup is not connected to the work domain, connection might be refused.
If errors continue to occur: sometimes it is important that a
username:s:YOUR_USERNAME_HEREline does NOT exist. If it does exist, try removing it! This way, when you connect to the laptop you will get a windows login screen and the username will already be filled in. Then, fill in the password of your work account.

Troubleshooting Link to heading
Firewall & Anti virus software Link to heading
If this post doesn’t help you out, check if your firewall or anti virus software blocks incoming connections. You can find lots of forum posts and blog posts about this on your favorite search engine; there is no point in me randomly linking some. Good luck!
Microsoft account login issues Link to heading
When I was working on this blog post, I had some difficulty logging into my work laptop with a Microsoft account. I found a forum post about this that ended up helping me.
Apparently, password login won’t work if you logged in on the actual laptop using a non-microsoft-account-password technique (like fingerprint, pincode, etc..) first. if this is the case, restart/lock/sign out of the laptop and log-in with your microsoft password. Then try connecting via RDP again. This is technically only an issue when setting up RDP because the next time we will connect via RDP after booting up the machine.
Finishing up Link to heading
Well, that’s the end of this post! I hope it helps you out.
I still want to mention that while this post is Windows (10) focused, all of these things should work for Windows 11 as well. Also, if you use Mac, Linux, Android, iOS or anything else and want to connect to a Windows client, it should all be possible.. But the settings will need to be configured differently!
If you have any questions, problems or suggestions, let me know in the comments below!
Did you enjoy this post?
